Azure Virtual Network Manager - Controlling virtual networks at scale

We are discussing Azure Virtual Network Manager (AVNM). It's a service that interests me. So, let's explore and see what it's all about.
If you don't know what AVNM is, it is a central management service for your virtual network resources. You should be able to easily manage your virtual network infrastructure while scaling your cloud-based workloads. More information from the product page is here. Azure Virtual Network Manager | Microsoft Azure
Before we get started, it's important to note that at the time of this blog, AVNM is currently in public preview. This means it will likely have changes before hitting GA.
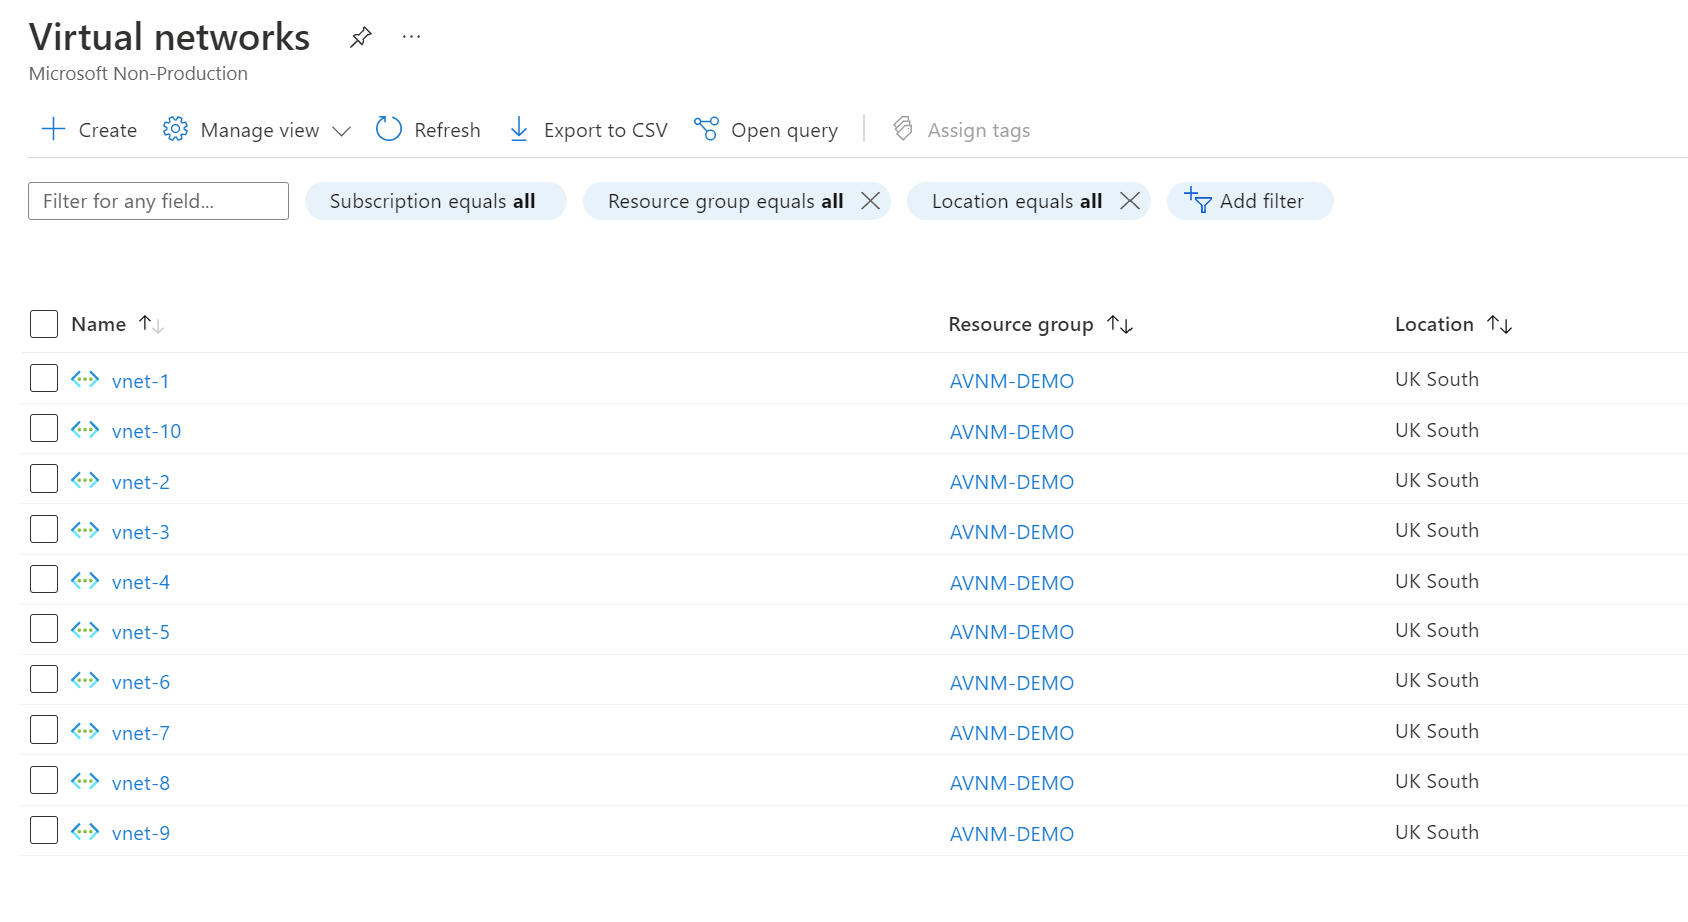
Before we start, let's create some virtual networks. To do this, you can use the command below to create ten virtual networks. I'm using the CLI with PowerShell loops (I prefer looping in PowerShell, sorry)
$location = "uksouth"
$resourceGroupName = "AVNM-DEMO"
$virtualNetworkCount = 10

az group create --name $resourceGroupName --location $location

foreach ($virtualNetwork in 1..$($virtualNetworkCount)){
    az network vnet create --name "vnet-$($virtualNetwork)" --resource-group $resourceGroupName --address-prefixes $("192.168.$($virtualNetwork).0/24") --location $location --subnet-name "default" --subnet-prefixes $("192.168.$($virtualNetwork).0/24")  --tags "env=test"
}
This code will also be on my GitHub page. We are simply declaring variables at the top of the script, creating a resource group and looping over the virtualNetworkCount variable. This will make ten virtual networks and a subnet called default. An example is below.
- Virtual network name: vnet-1
- Virtual network address space: 192.168.1.0/24
- Subnet name: default
- Subnet address: 192.168.1.0/24
Once deployed, we should have ten virtual networks in one resource group, like the screenshot below. We also added a tag to the virtual networks resource with a key/value pair of env=test (You'll see why later).
Let's go ahead and deploy our virtual network manager resource. Deploying the resource is pretty straightforward.
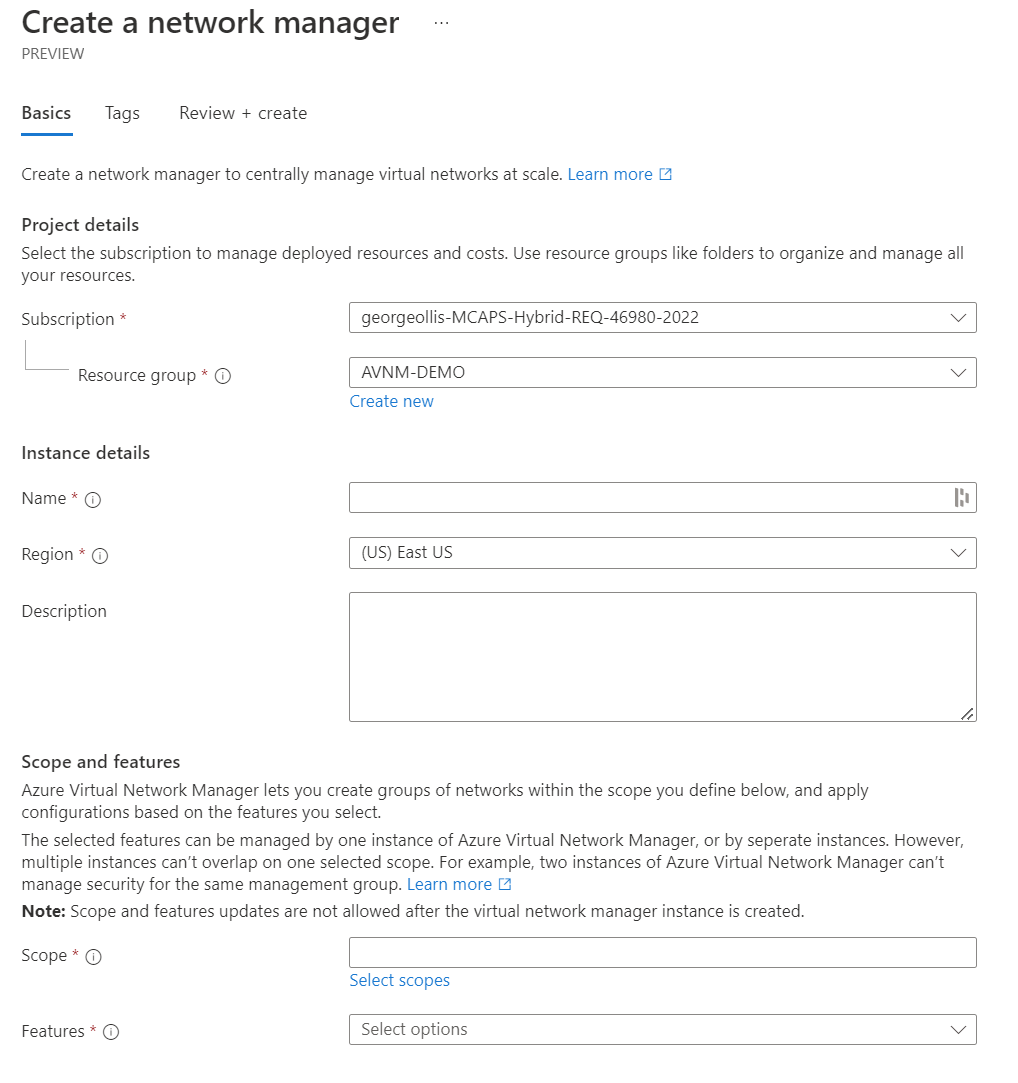
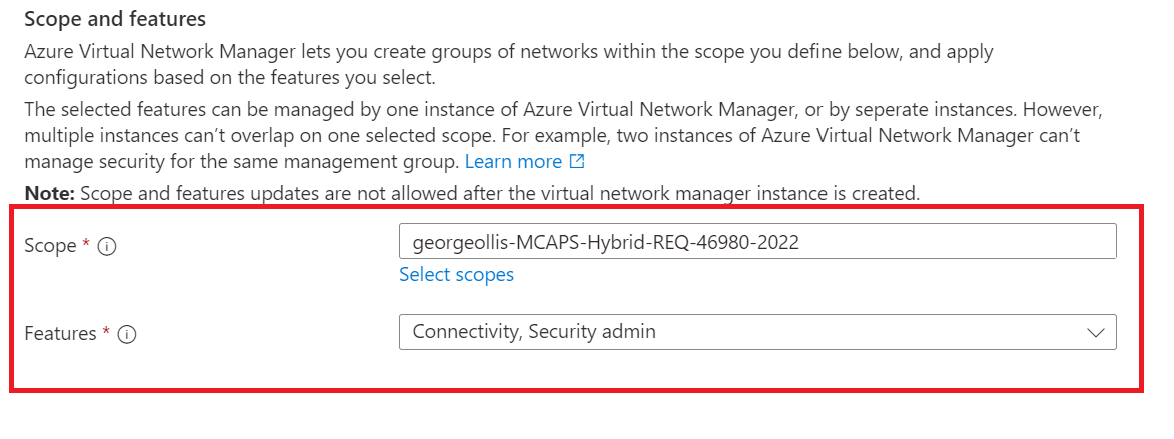
We need to provide standard information such as name and region. However, we also have scope and features. Let's explore those two.
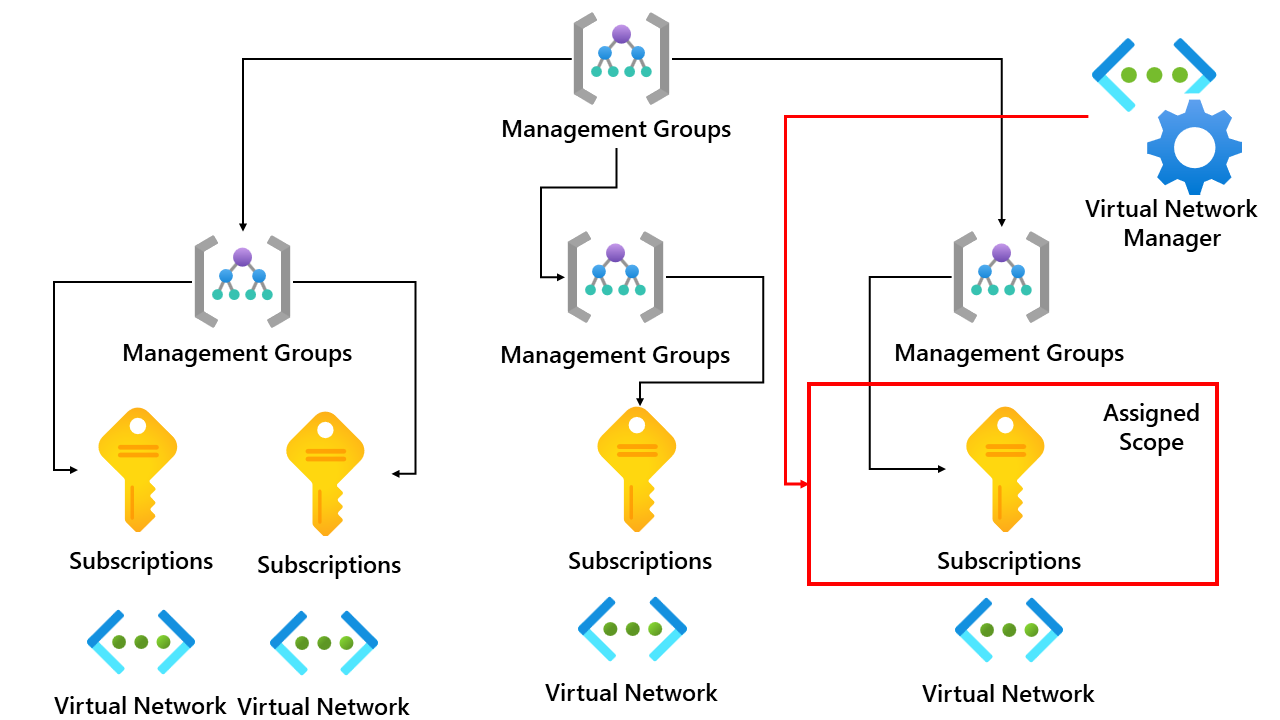
Scope defines the boundary of what virtual networks the virtual network manager resource can manage and control. This means that if we assign the scope to a single subscription, that virtual network manager resource can only manage virtual networks within that subscription. I created an overview below.
The second option we have is called features. We can select either or both from the drop-down, depending on our use case.
- Connectivity
- Security Admin
Connectivity
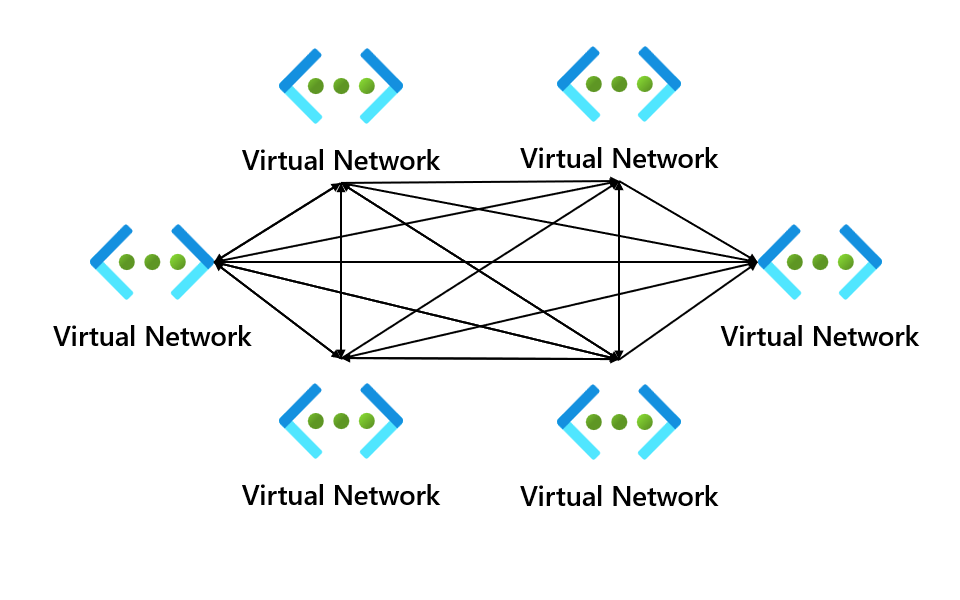
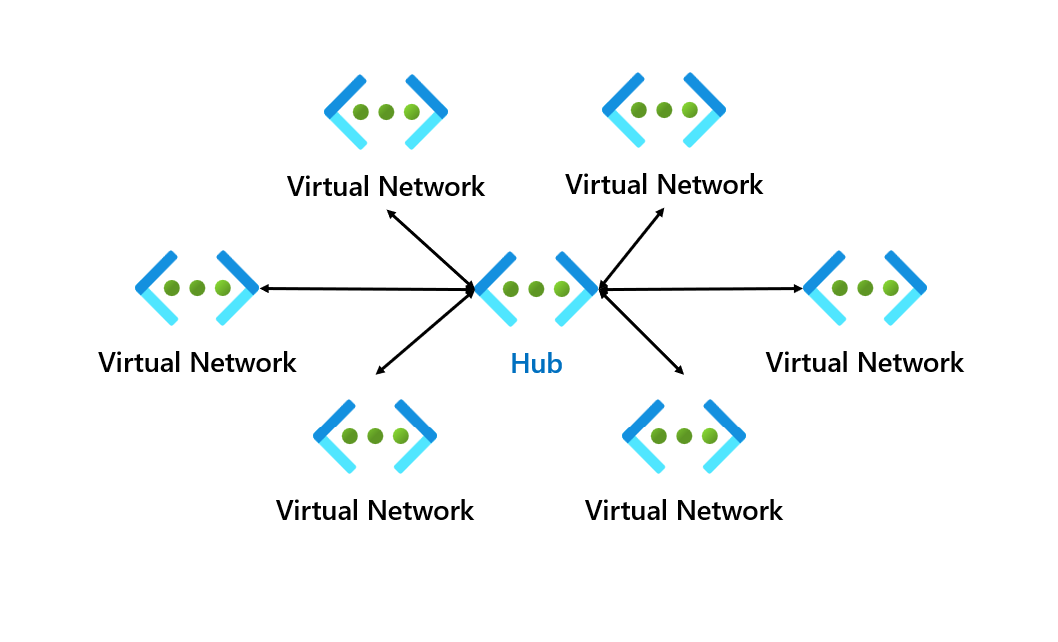
The connectivity configuration setting allows you to use two different networking topologies. One which we will use in this demo will be the mesh topology, but you can also use the hub and spoke topology.
Security Admin
A security admin rule allows you to enforce security policy rules that match the conditions you have set. You can only define security administrative rules for resources within the scope of the Azure Virtual Network Manager instance, which we mentioned earlier.
These security rules have a higher priority than network security group (NSG) rules and will get evaluated before NSG rules. Also, note that security admin rules don't change your NSG rules.
An overview of the configuration can be found below.
Let's now create our AVNM resource. The deployment doesn't take long, as we make the resource shell; our main configurations are performed after the deployment.

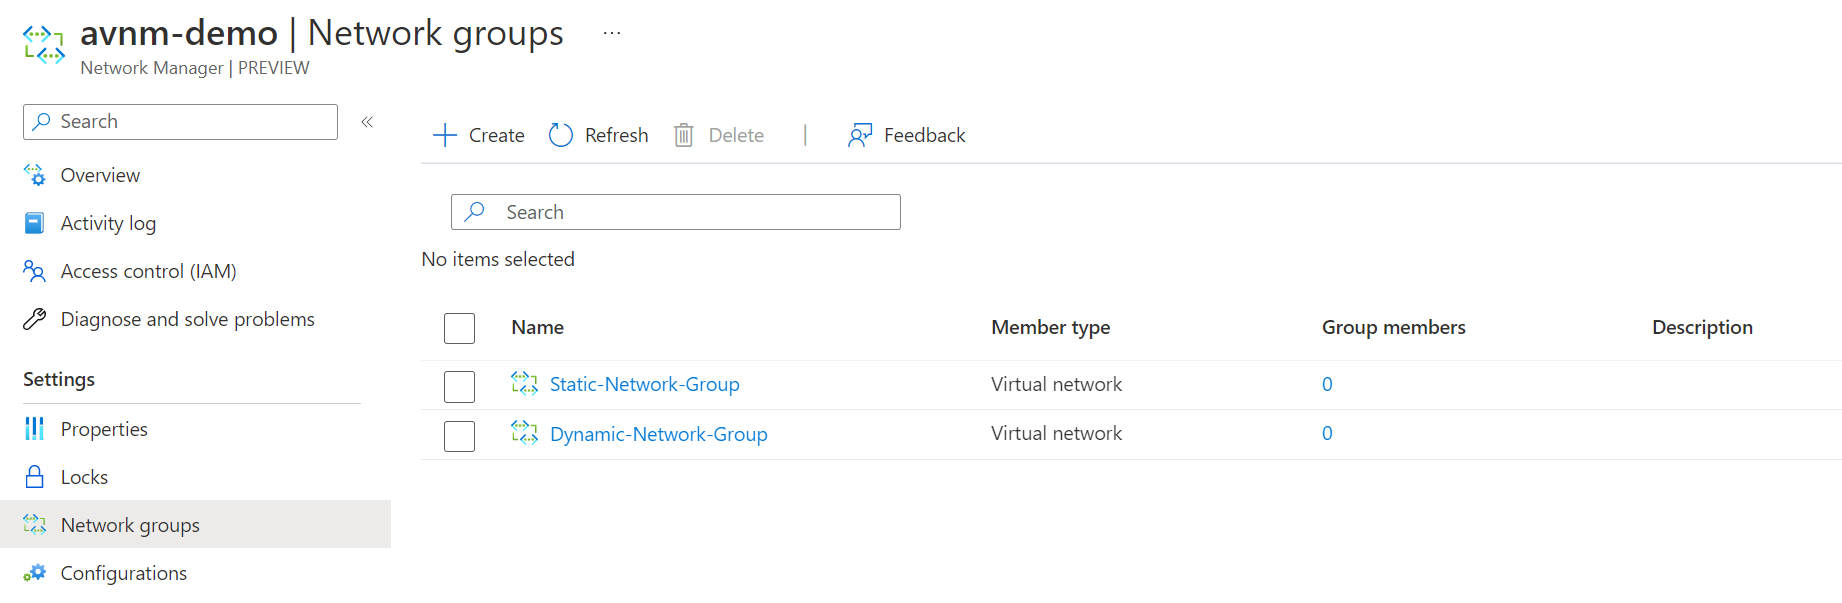
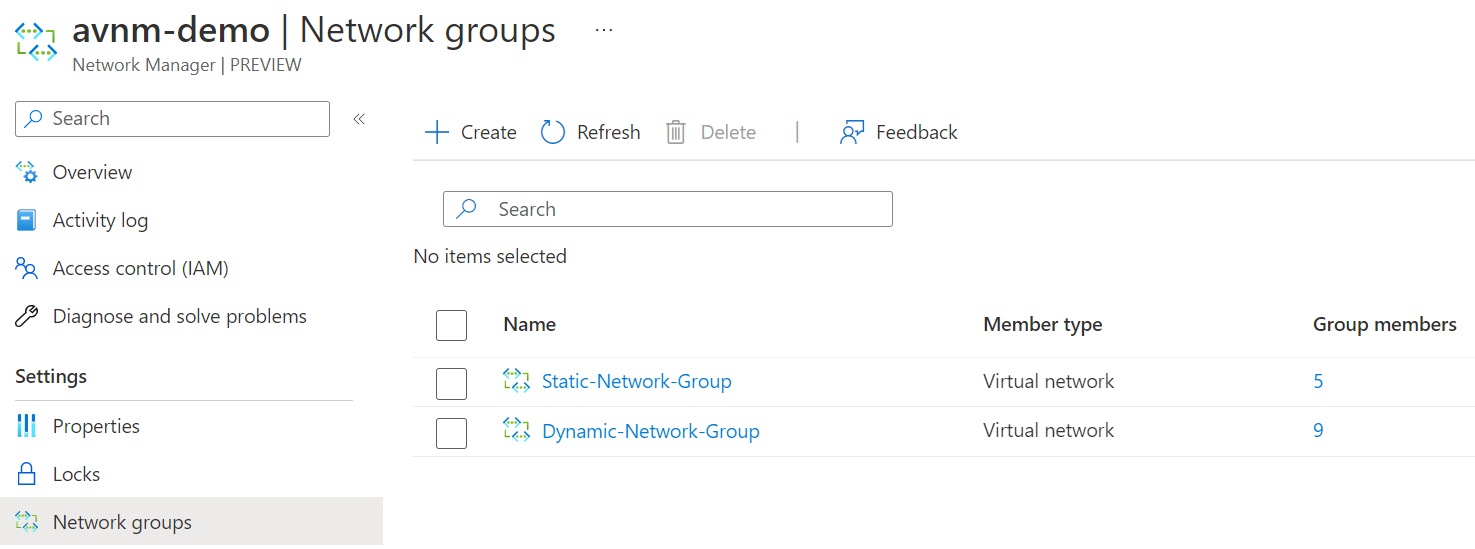
Once the deployment is finished, and we have the resource, it's time first to set up the network groups. Network groups are just groups of virtual networks. Network groups can be created statically or dynamically. An overview can be found below.
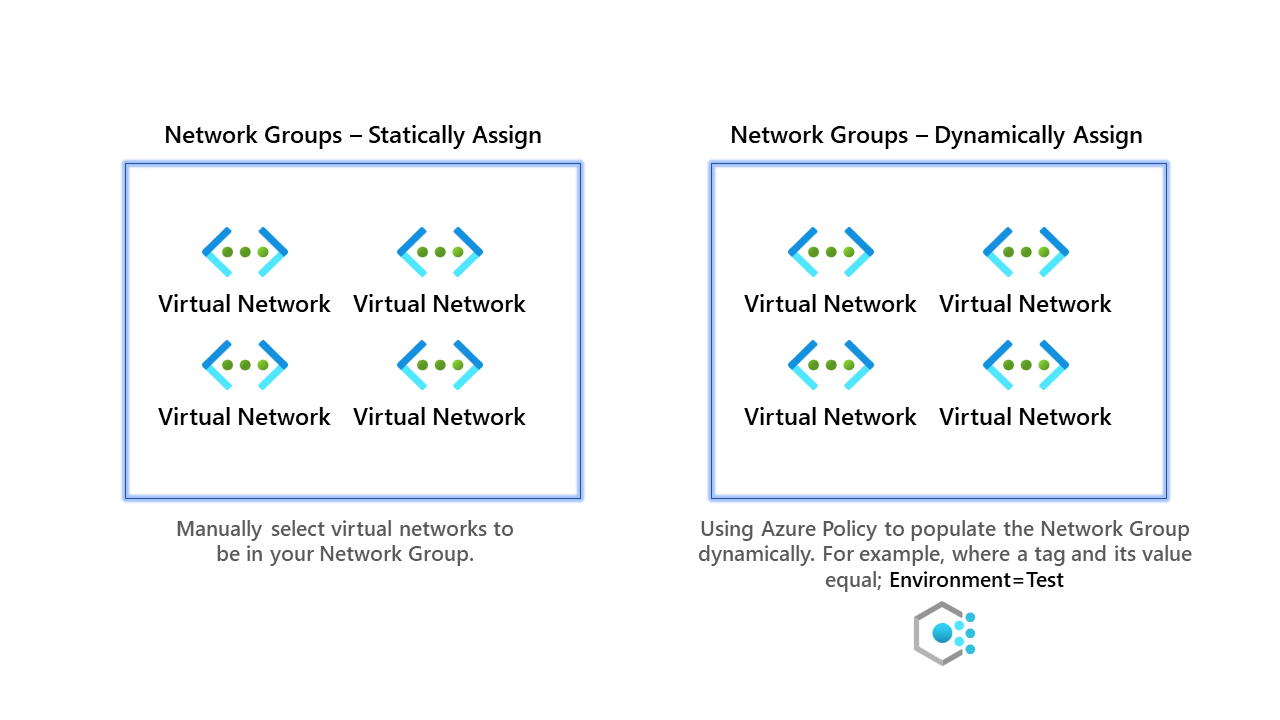
For our primary example, we shall use dynamic groups, but below are instructions for both.
Network Groups - Statically Assign
- First, go and create your network group.
2. Select our static network group and click group members.
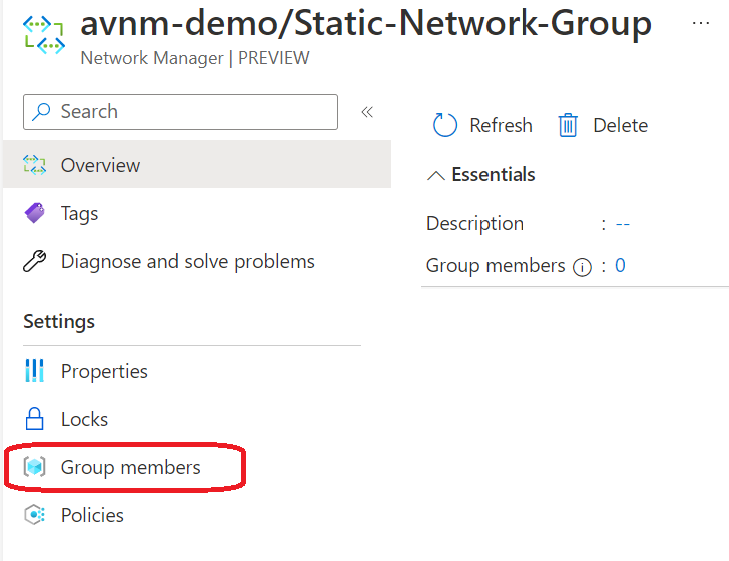
3. Click add and then manually add members.
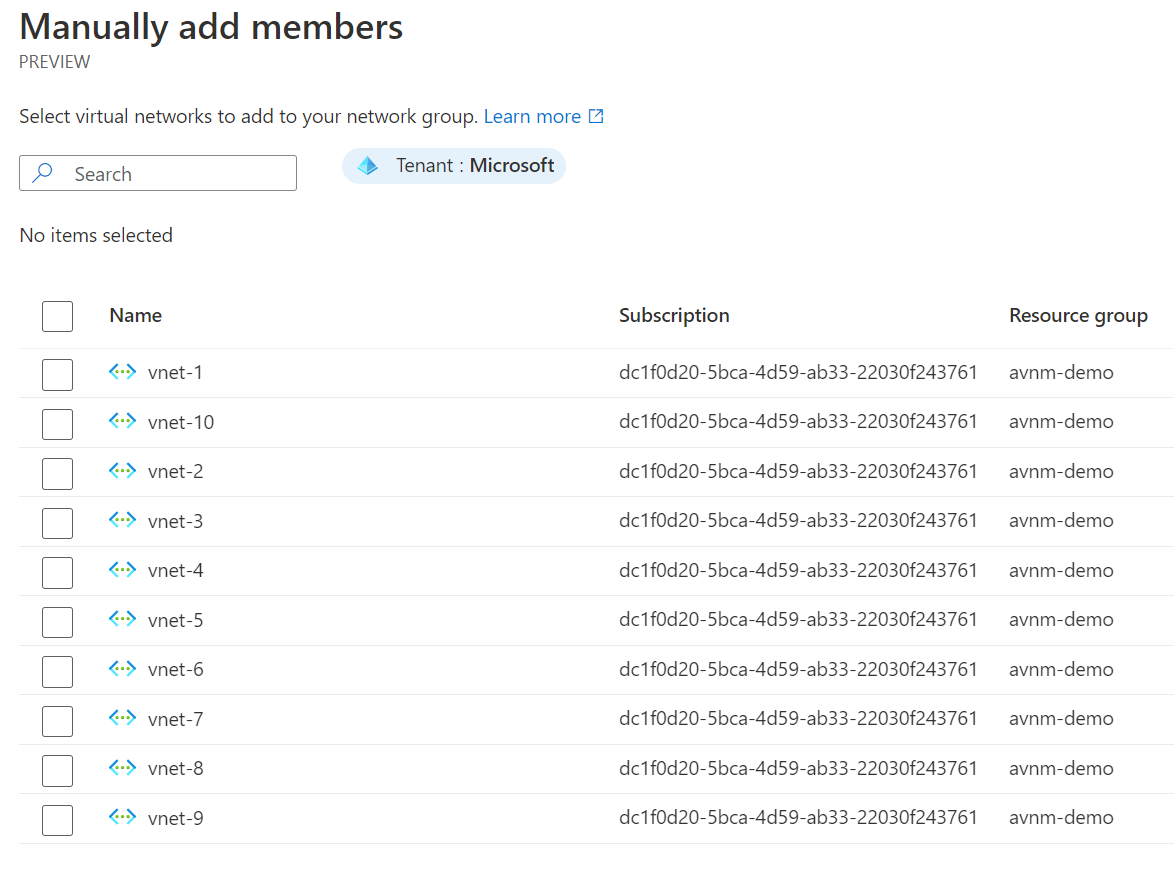
Once you've selected your virtual networks for the network group, you are finished. As you can see, statically assigning memberships is straightforward but may not provide you with true scalability and security, as you would need to monitor new virtual networks closely.
Network Groups - Dynamically Assign
Now for the better solution, dynamic assignments of virtual networks into the network group. Behind the scenes, this uses Azure Policy to enforce, whereas static assignments do not use Azure Policy.
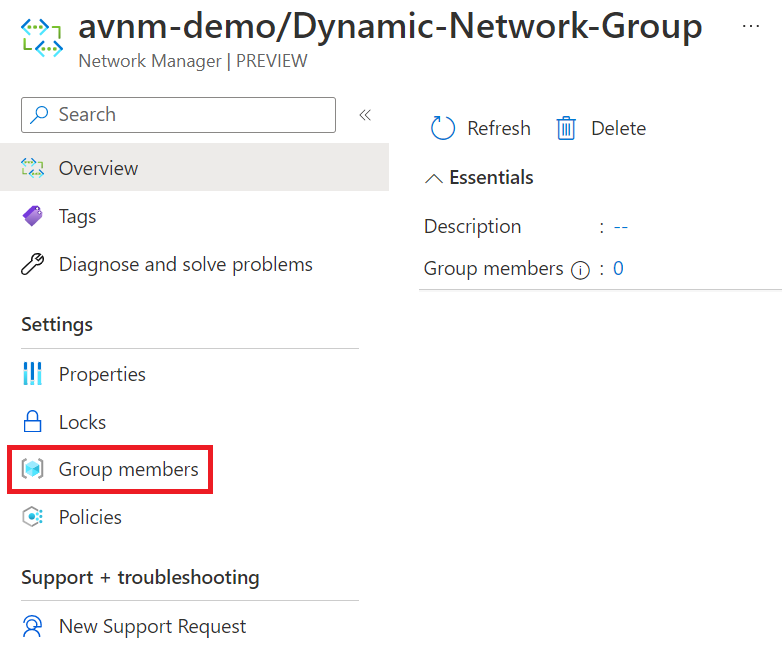
- First, go ahead and create your network group. Our dynamic network group is called simply Dynamic-Network-Group.
2. When you've selected your network group, click group members.
3. Click add with Azure Policy; you will be presented with a wizard to configure how you want the policy to add virtual networks to the network group.
In our script at the start of the blog, we ensured that all virtual networks would have the key/value tag of env=test. We shall use this tag and value to add virtual networks to the network group.
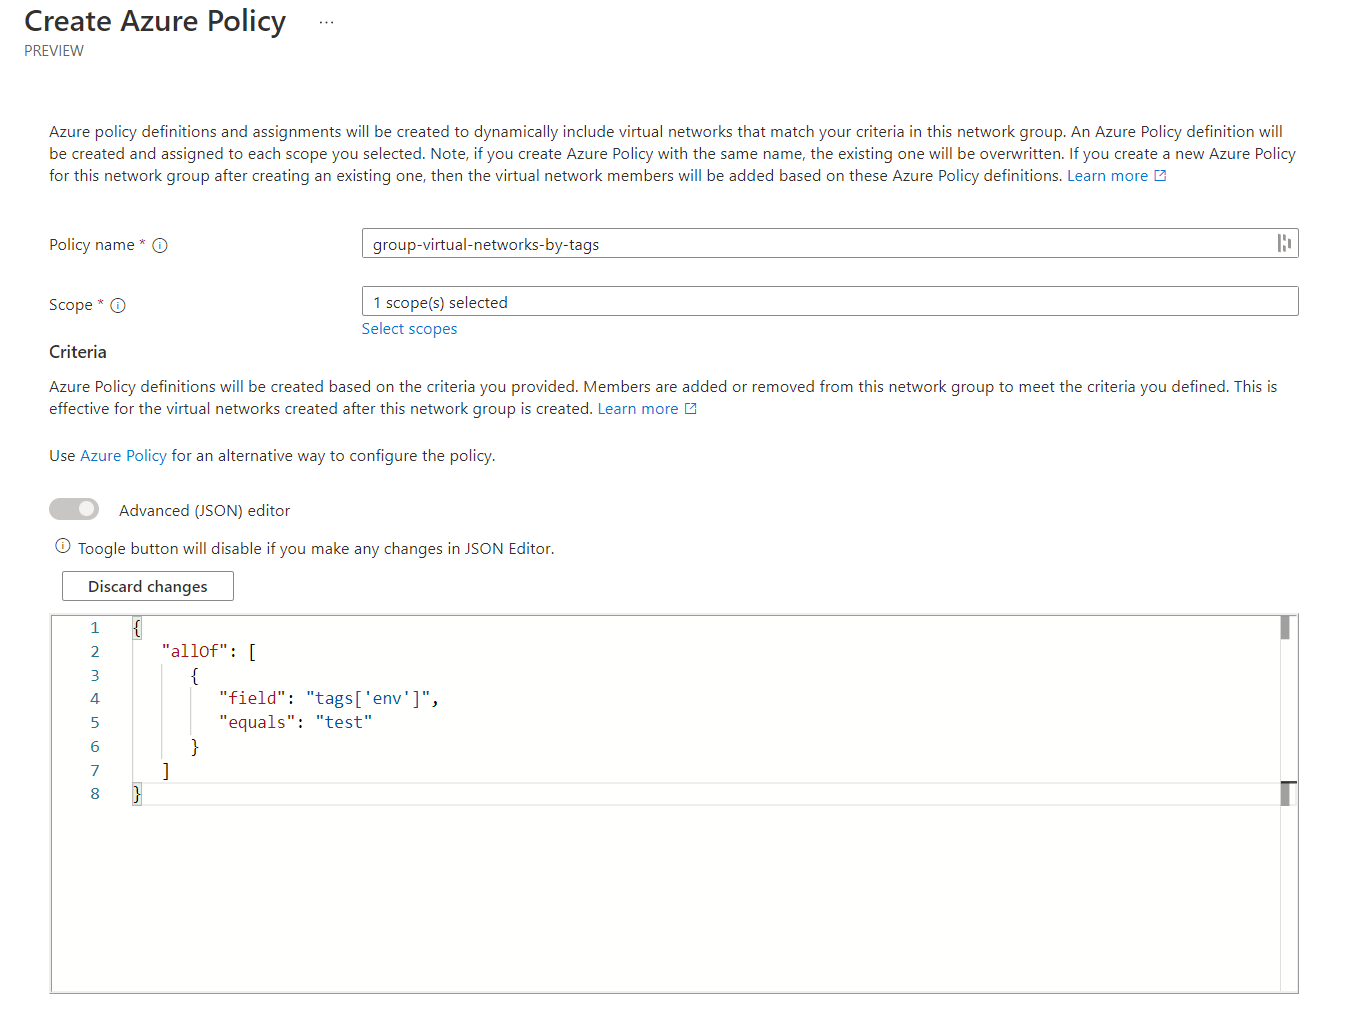
This uses the Advanced (JSON) editor view instead of the default one. I'm hoping the interface that is provided improves in the future. However, if you understand Azure Policy, I recommend using the advanced editor. For all the visual learners, below you can see how this works high level.
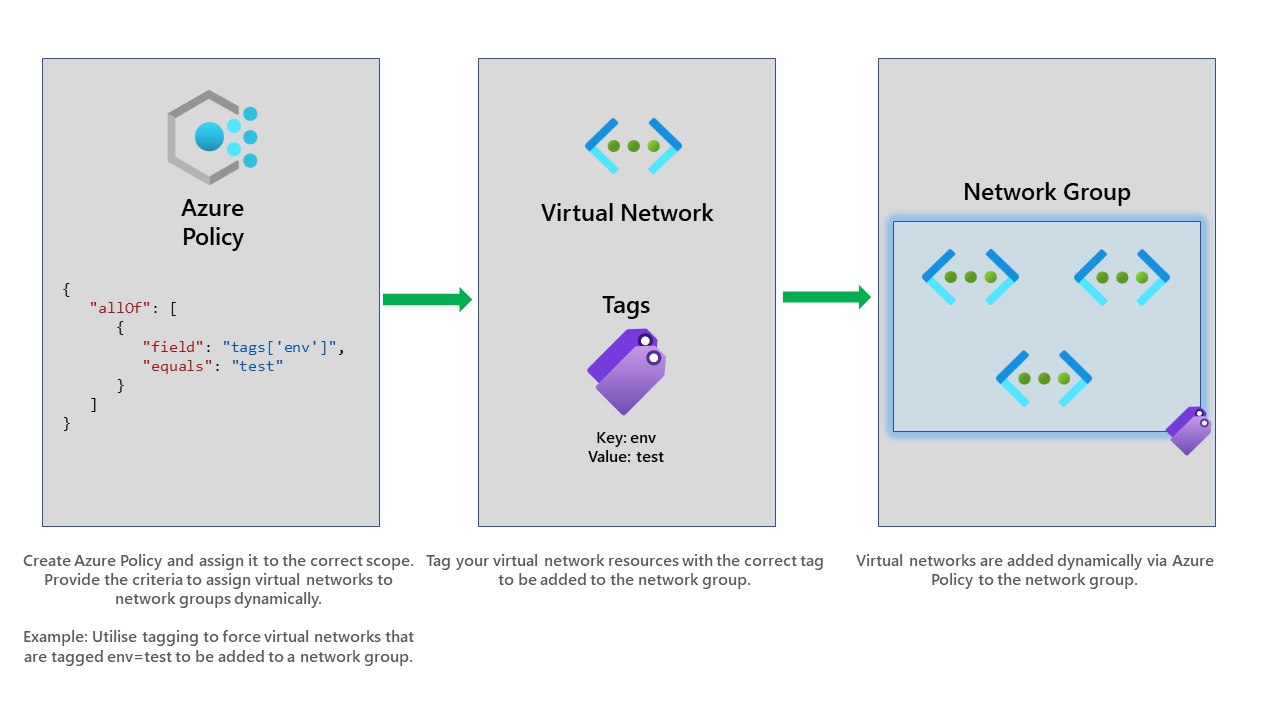
Once we've created it, it will now assign an Azure Policy will this configuration to our selected scope, which in our case, is the subscription.
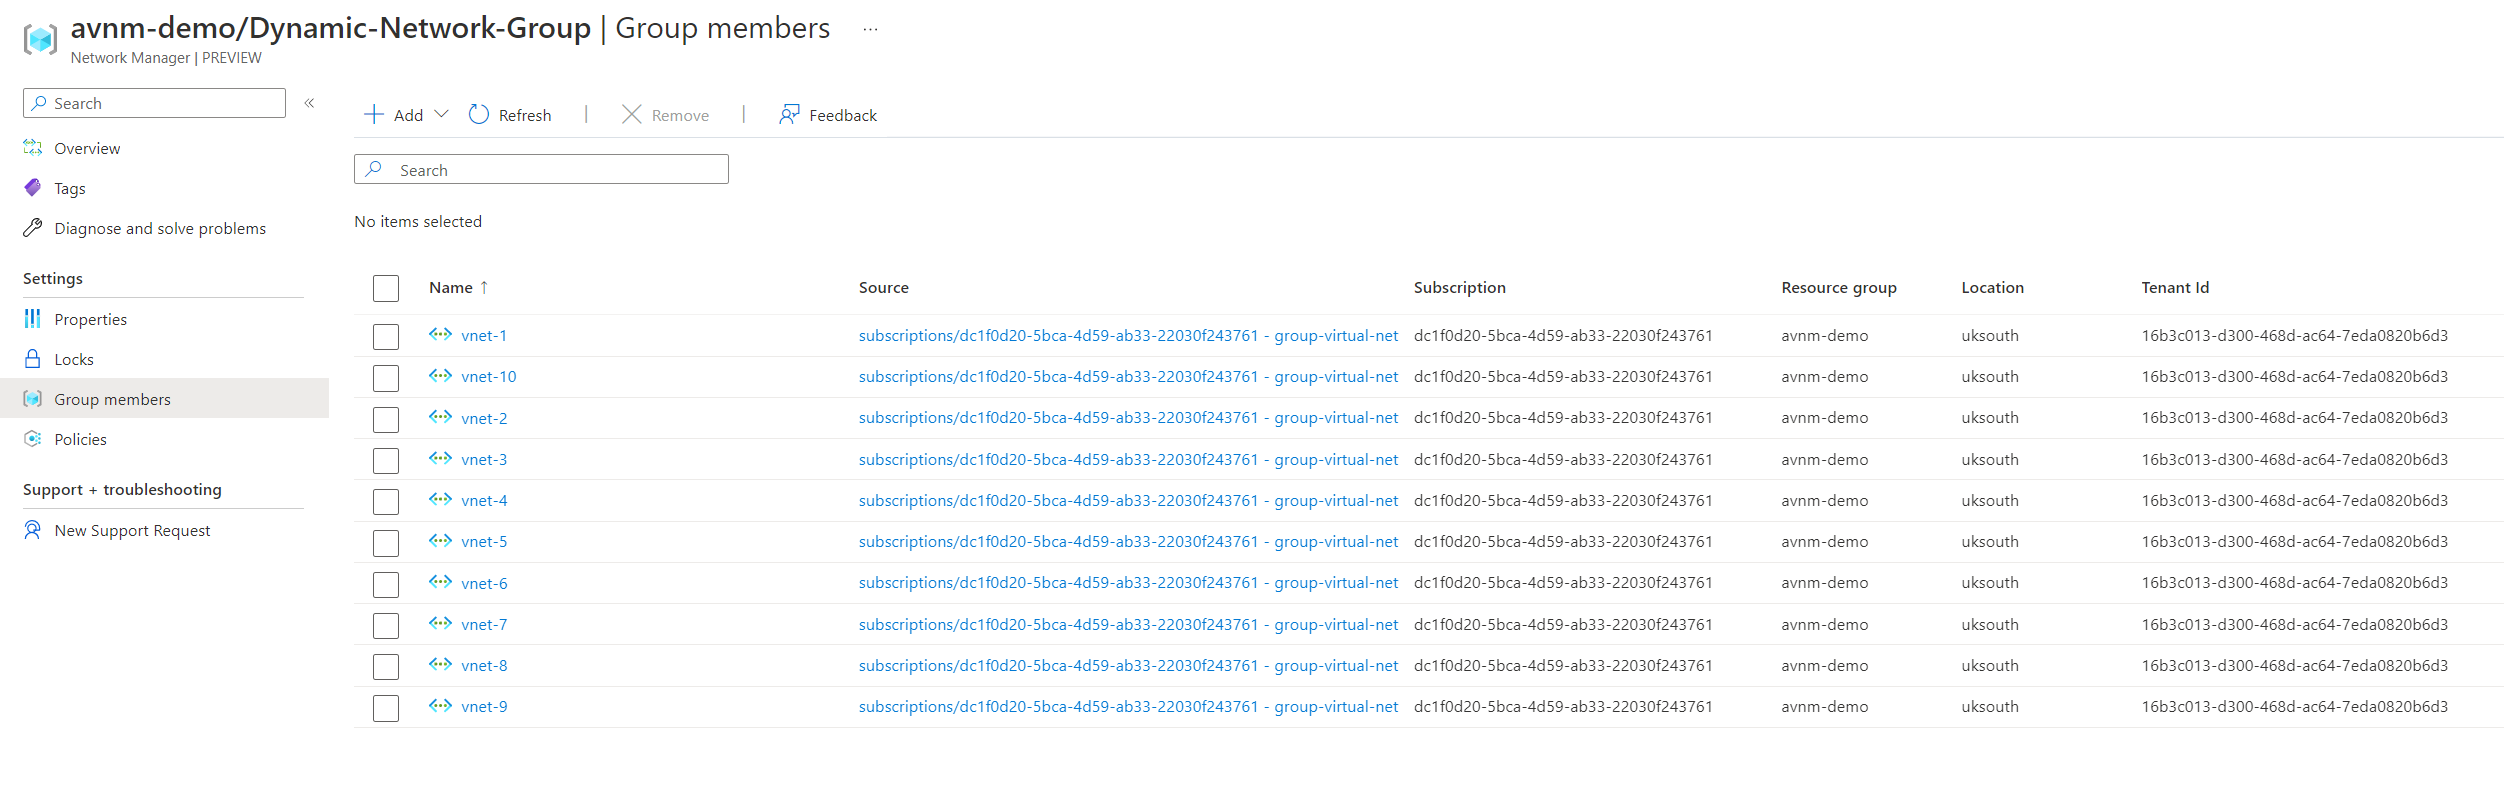
Viewing the network group members, we can see if the assignment has worked.
Selecting the policies on the left screen shows us the policy that has been assigned and its scope.
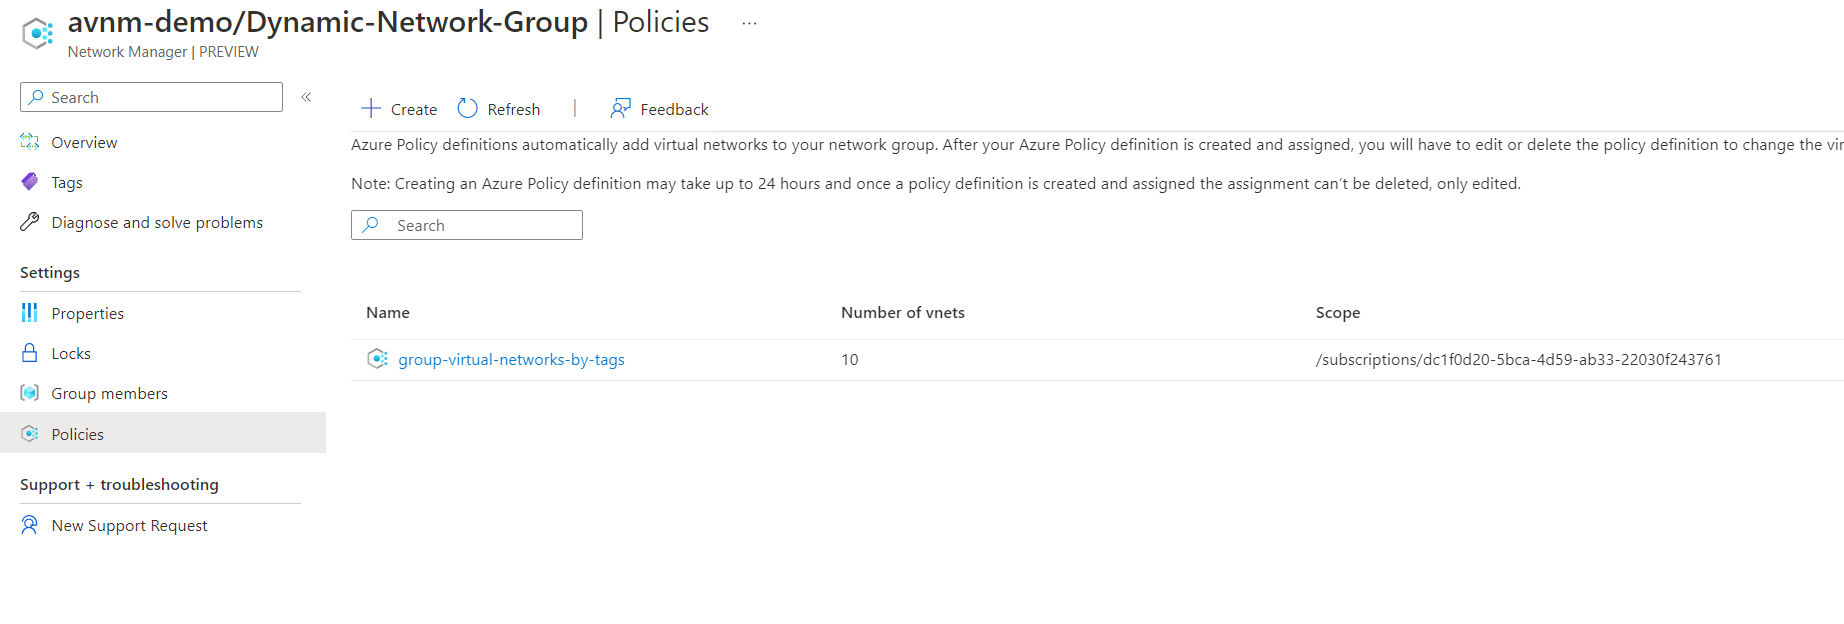
Clicking on the policy will allow you to change the configuration.
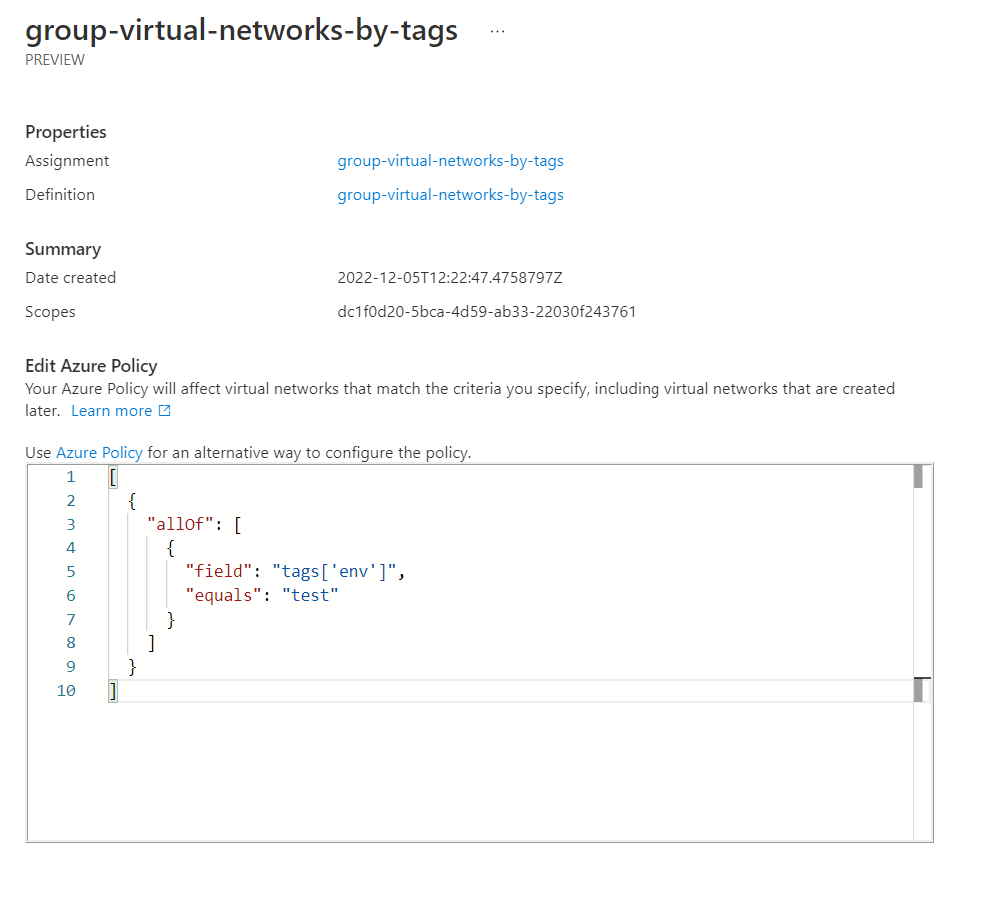
However, you can also go to Azure Policy and view the resource configuration entirely.
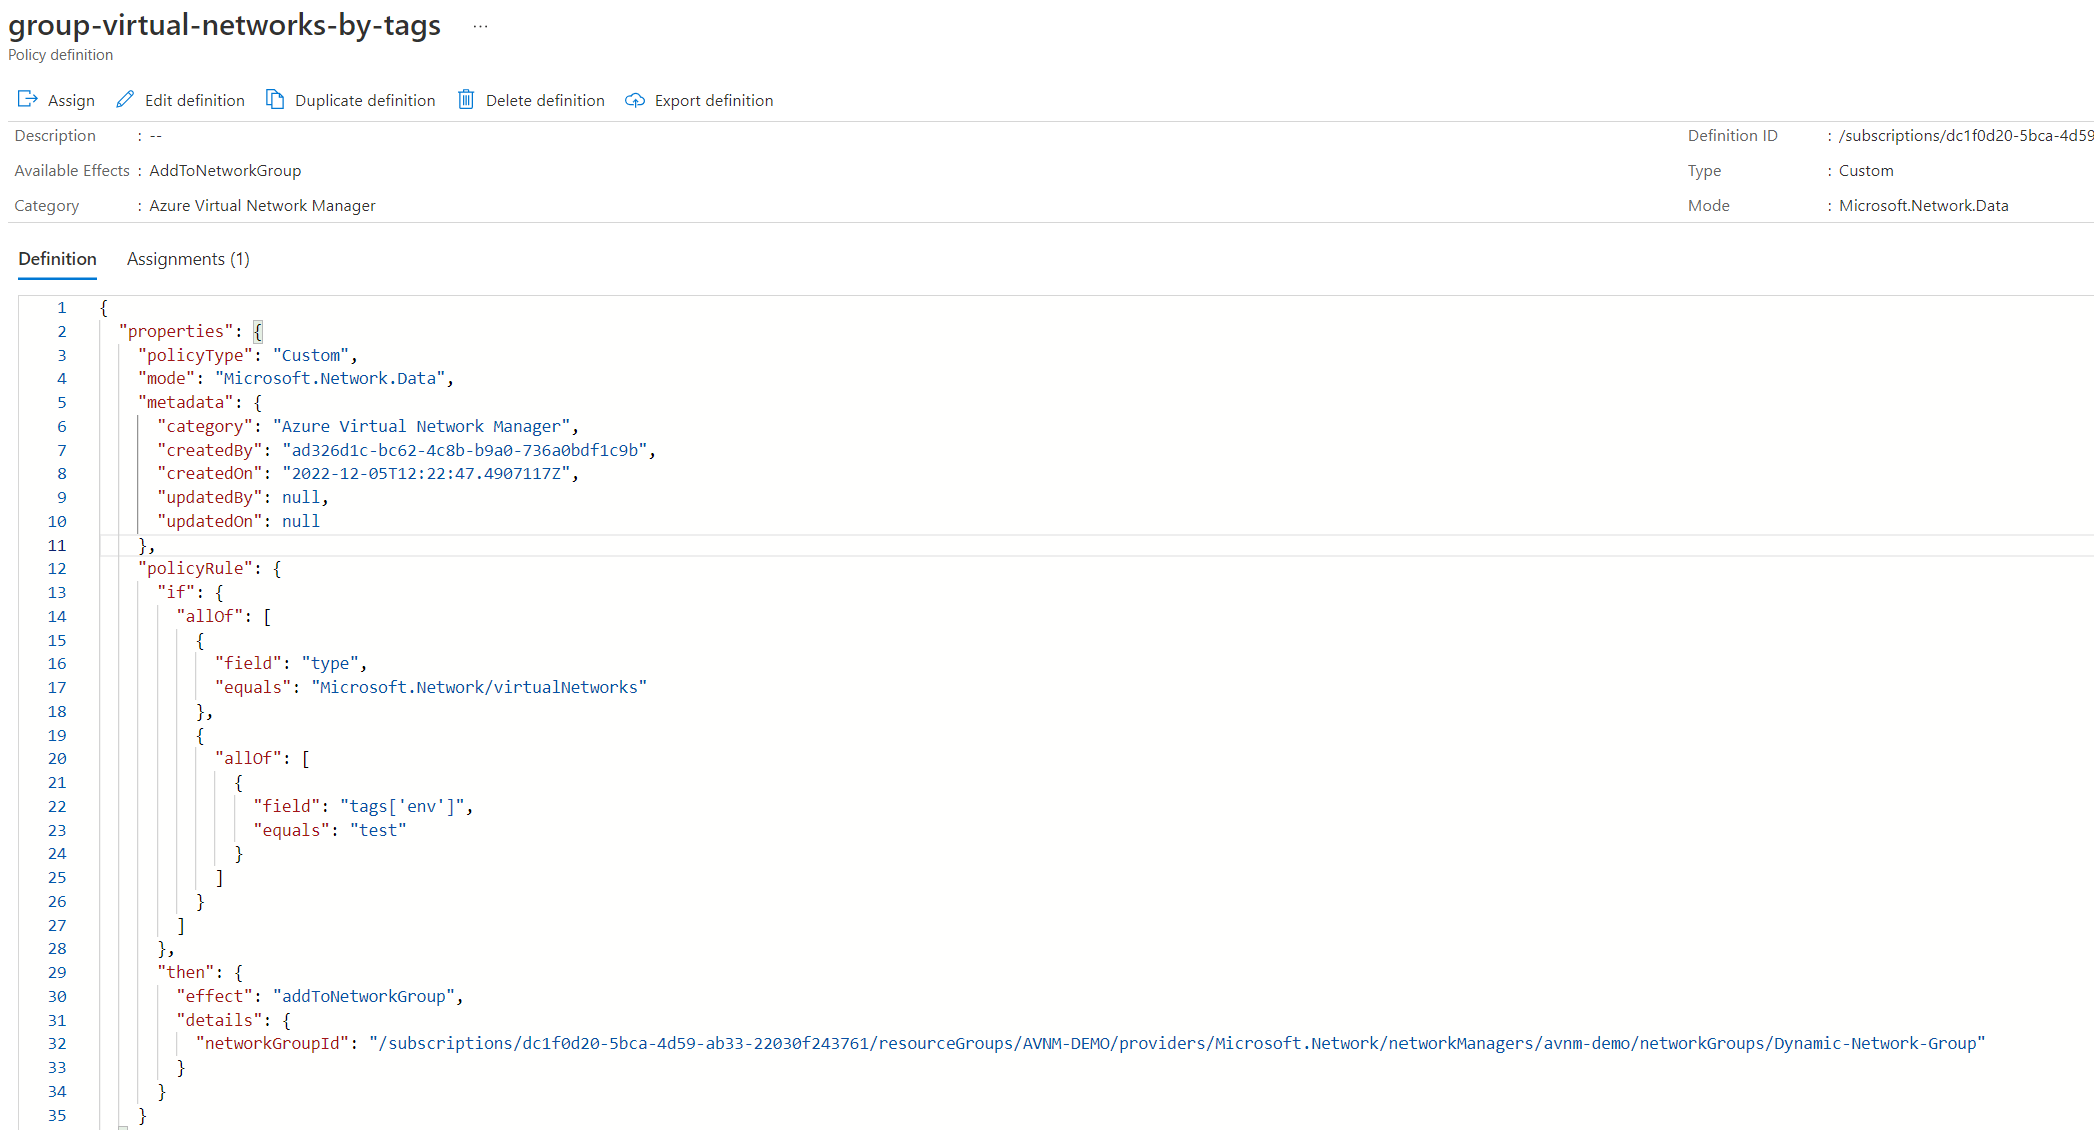
Most of the useful information is in the policyRule part. From the policyRule, we can see that it's looking for resource types of Microsoft.Network/virtualNetworks and the tag env and its value must equal test.
The effect is also interesting and has been designed explicitly for AVNM. The effect is addToNetworkGroup. So this is clearly how it automatically adds virtual networks to the network group. How cool!
"policyRule": {
      "if": {
        "allOf": [
          {
            "field": "type",
            "equals": "Microsoft.Network/virtualNetworks"
          },
          {
            "allOf": [
              {
                "field": "tags['env']",
                "equals": "test"
              }
            ]
          }
        ]
      },
      "then": {
        "effect": "addToNetworkGroup",
        "details": {
          "networkGroupId": "/subscriptions/dc1f0d20-5bca-4d59-ab33-22030f243761/resourceGroups/AVNM-DEMO/providers/Microsoft.Network/networkManagers/avnm-demo/networkGroups/Dynamic-Network-Group"
        }
      }
    }
Now that we have our network groups created. Let's go ahead and start applying some configurations to them.
Configurations - Connectivity
Configurations are used for the management side of network groups. This is where we can apply security and connectivity configurations to our network groups. First, let's go through the connectivity side.

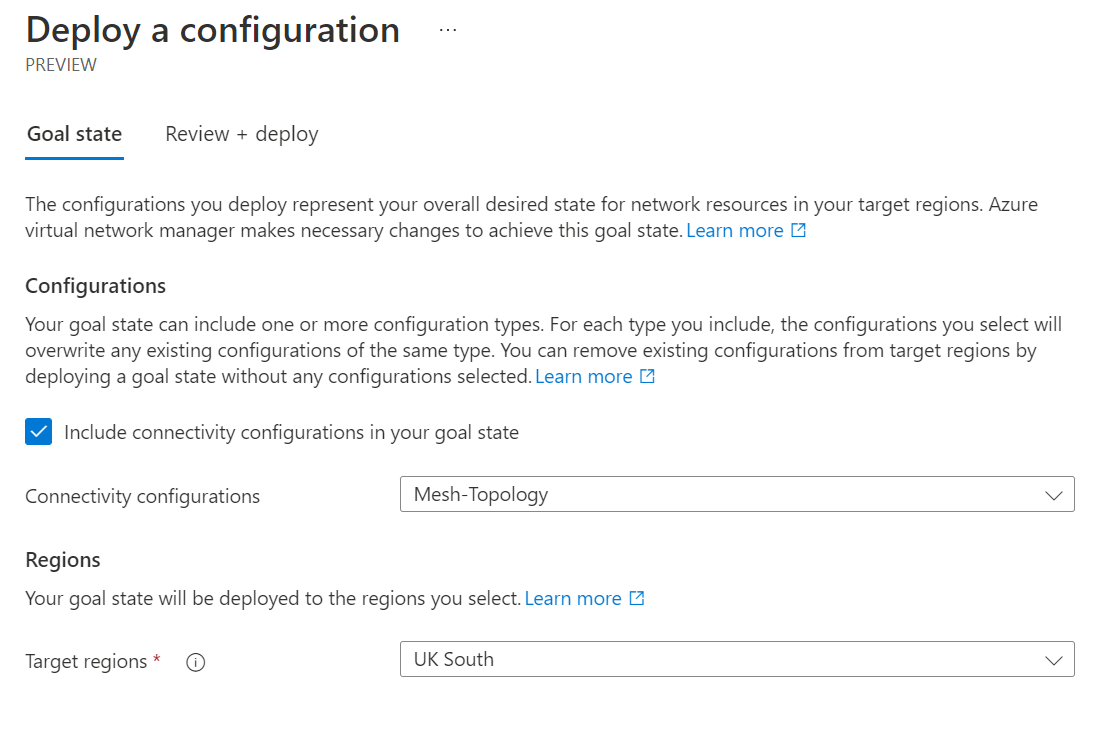
Once the connectivity configuration has opened, provide the configuration with a name and go to the next tab. You will be presented with the below configuration.
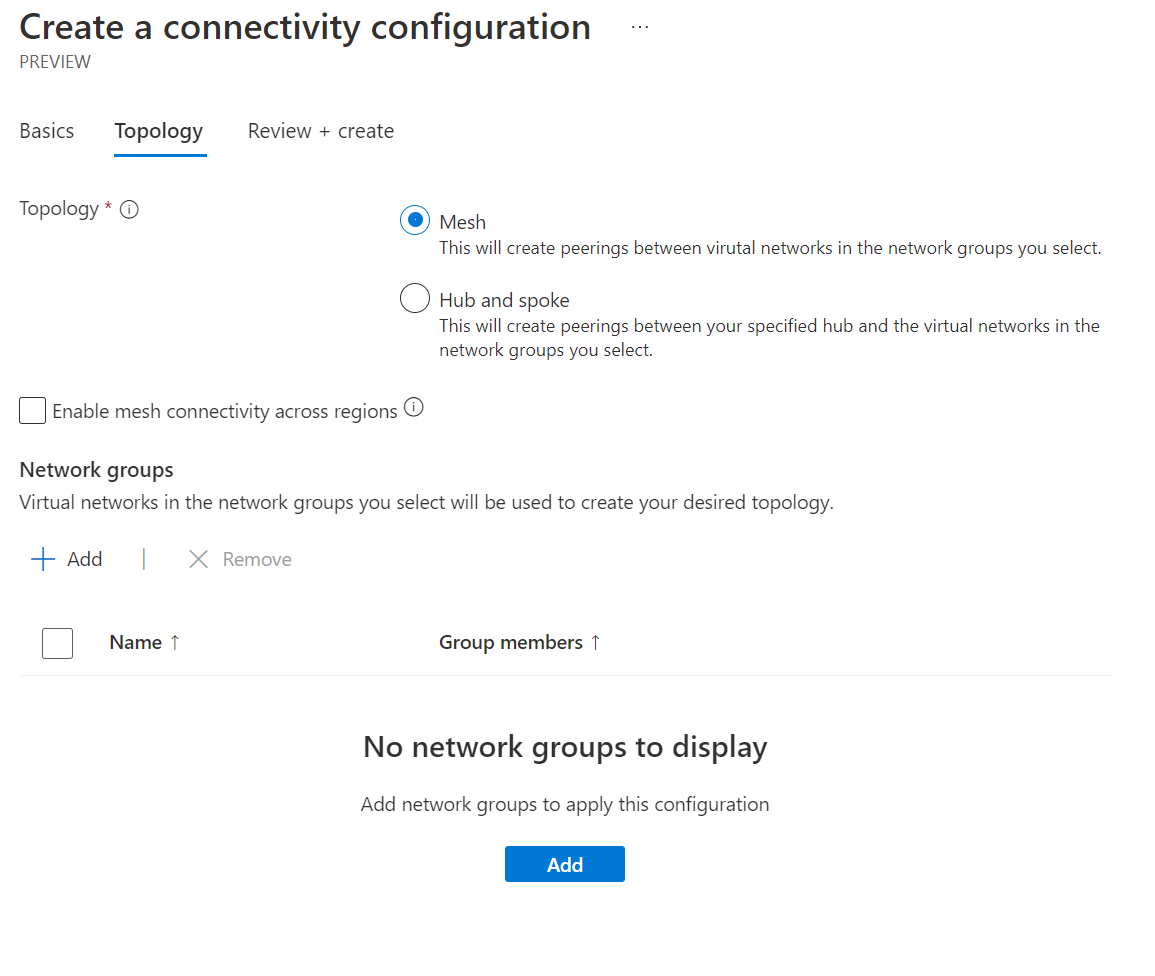
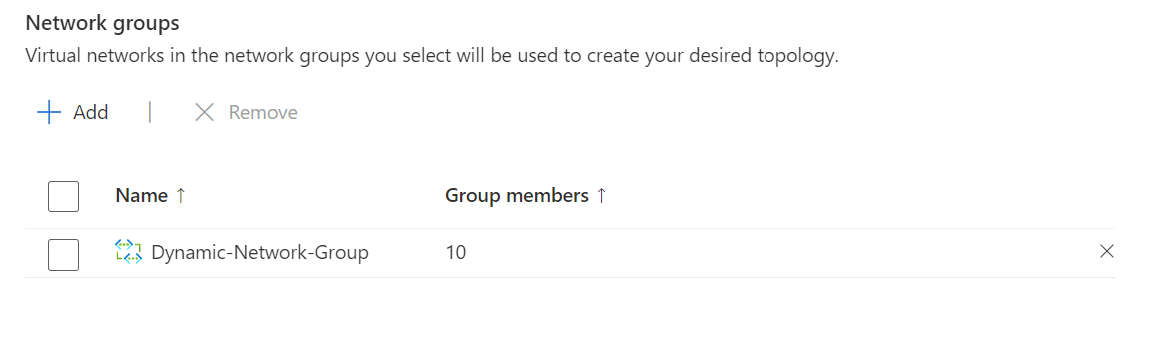
For our example, we shall use the mesh topology. Let's select the dynamic network group we created early.
Click review and create. Note: This does not deploy this configuration to virtual networks. This creates the configuration; we still need to apply it. We will do this next through what AVNM calls deployments.
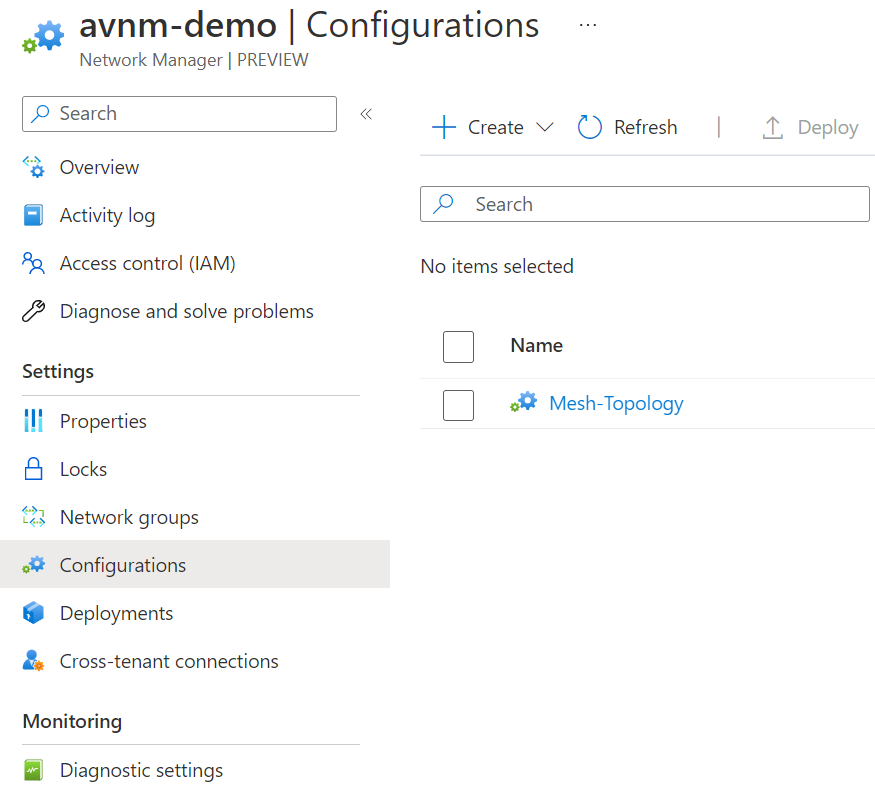
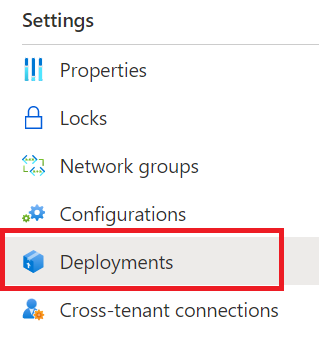
The above screenshot shows our configuration is complete. Now let's go to deployments on the left.
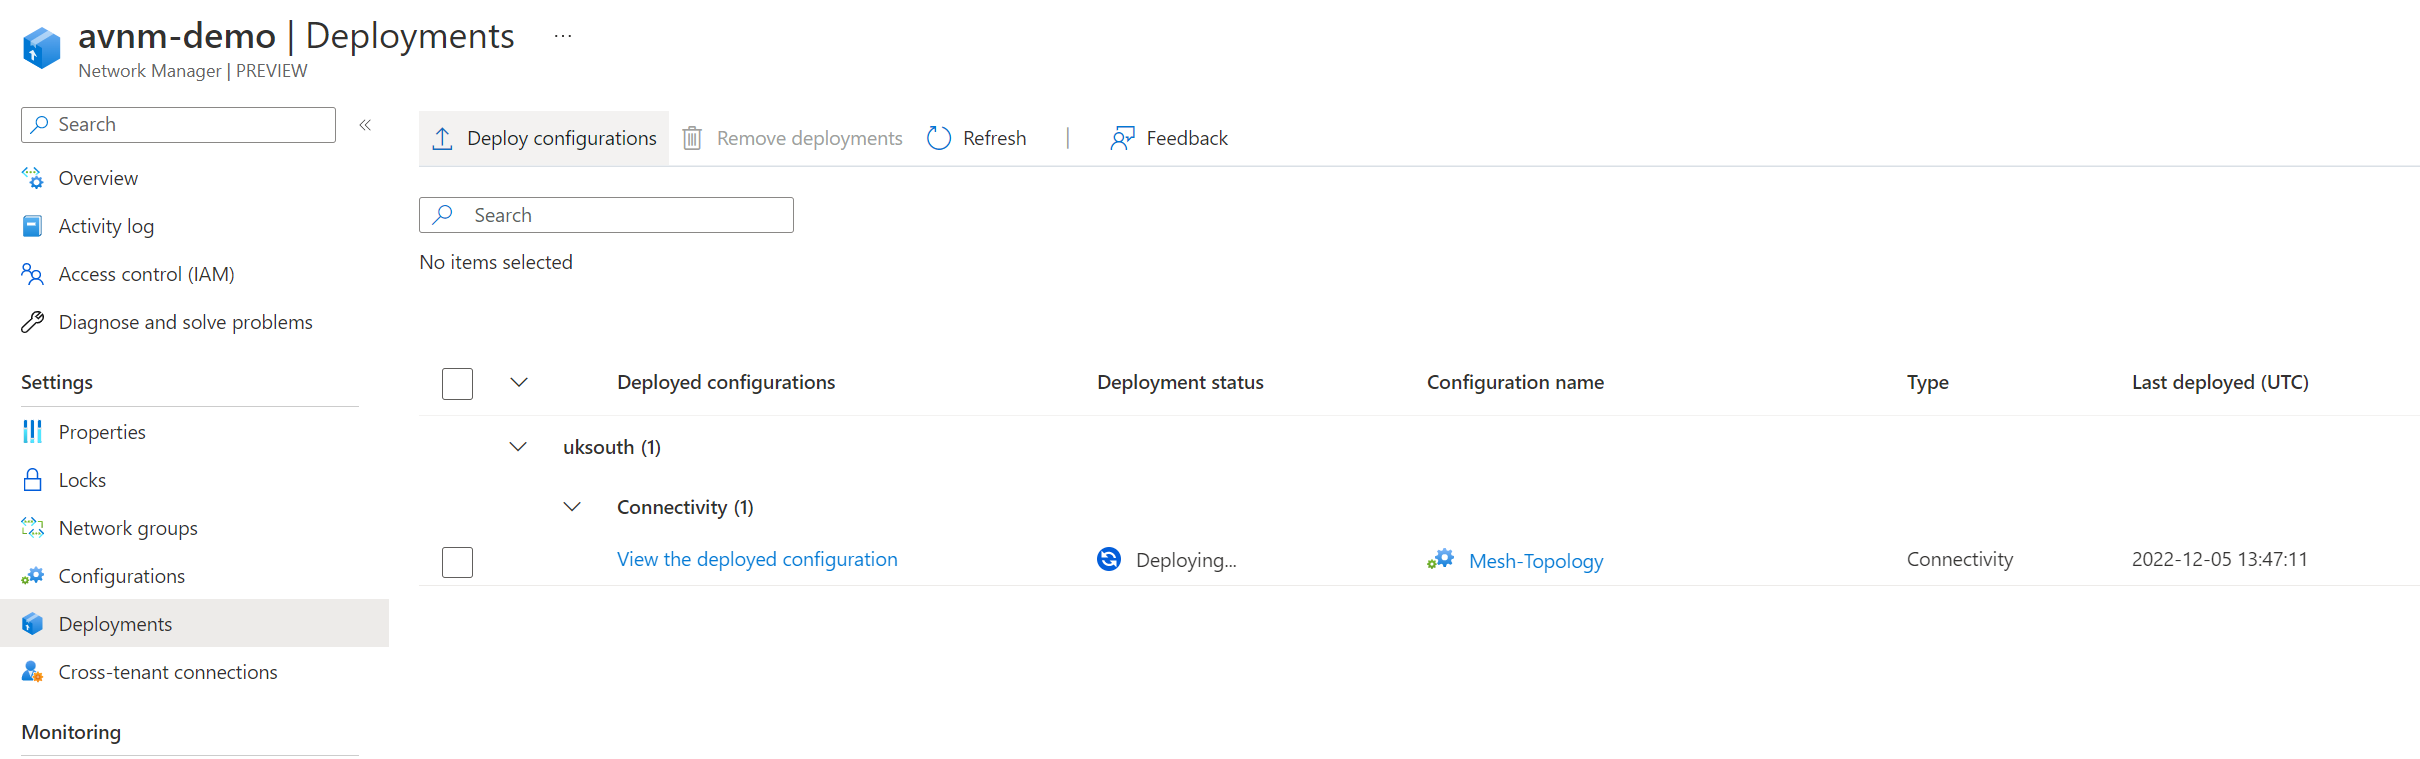
When in the deployments area, click deploy configurations and select the configuration we created. Click review and create once ready.
We can now monitor the status of our deployment. The deployment will go to complete once the configuration has been applied. Depending on your configuration and how many virtual networks are within your network group, this may take some time.
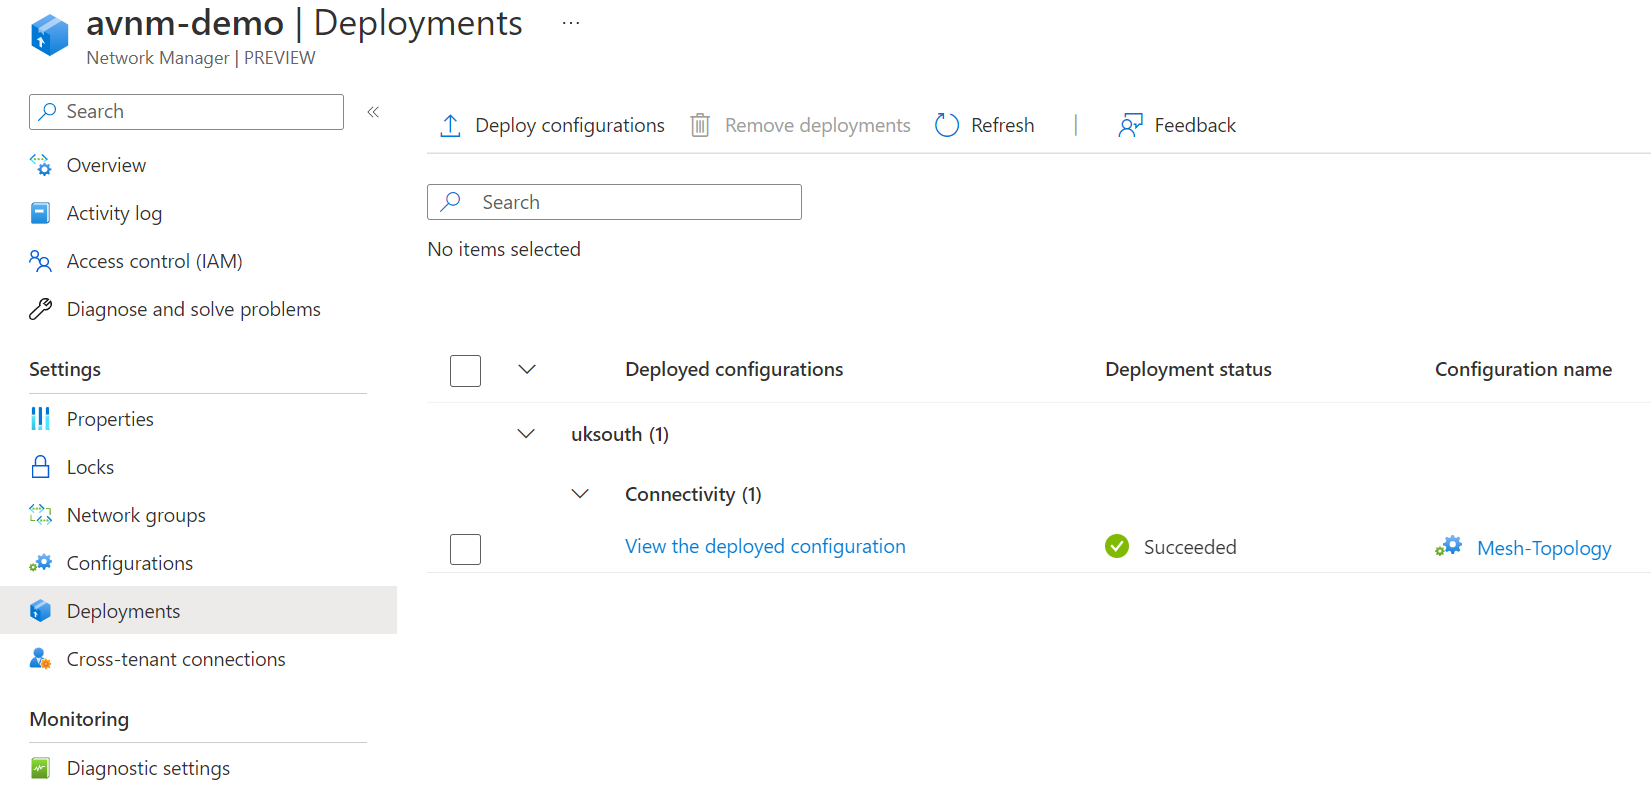
The configuration is now completed. How do we test this configuration?
With an full mesh topology, virtual networks within the network group should all be able to communicate and connect. Let's deploy two virtual machines to two different virtual networks in the network group and confirm. You can use the below script to deploy to Linux virtual machines.
az vm create --resource-group AVNM-DEMO --name avnm-vnet-1 --location uksouth --image Canonical:UbuntuServer:19_10-daily-gen2:19.10.202007100 --vnet-name vnet-1 --subnet default --admin-username azureuser  --admin-password Th1sIsOurDemo12345! --size standard_b2ms --public-ip-address ""
az vm create --resource-group AVNM-DEMO --name avnm-vnet-10 --location uksouth --image Canonical:UbuntuServer:19_10-daily-gen2:19.10.202007100 --vnet-name vnet-10 --subnet default --admin-username azureuser  --admin-password Th1sIsOurDemo12345! --size standard_b2ms --public-ip-address ""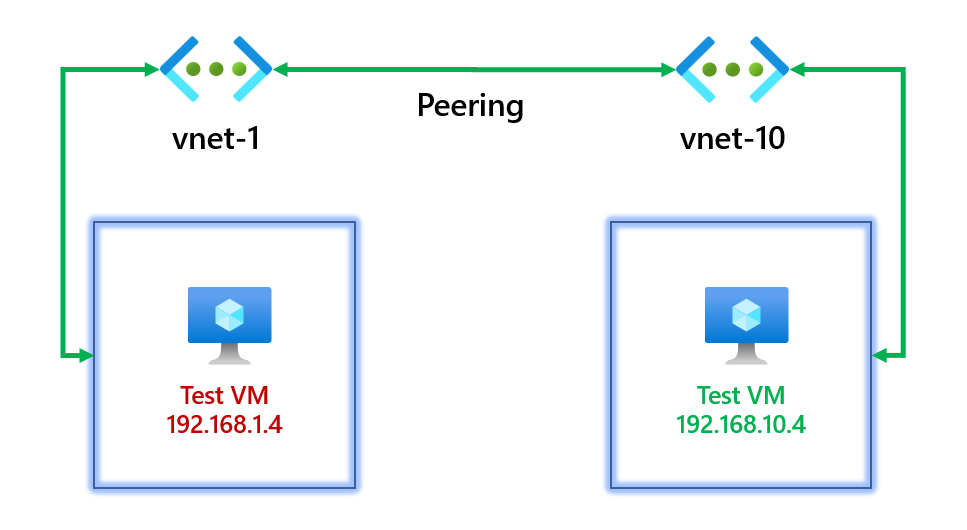
Let's see if we can ping 192.168.10.4 from the virtual machine 192.168.1.4 in vnet-1 to confirm that the connectivity configuration is complete.
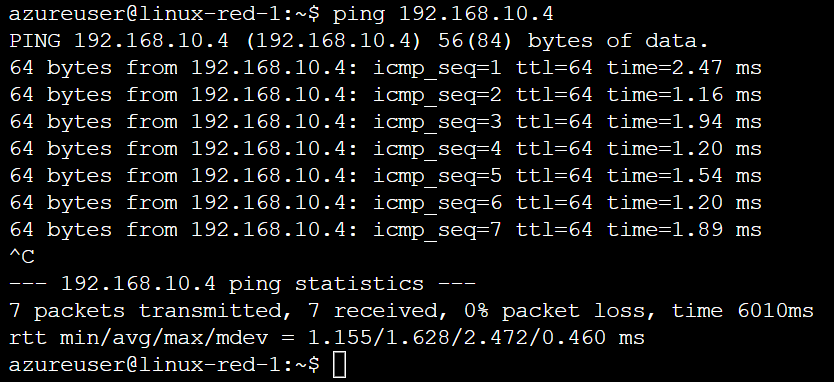
We can confirm we can communicate! Let's have a look at the virtual network to review the connection.
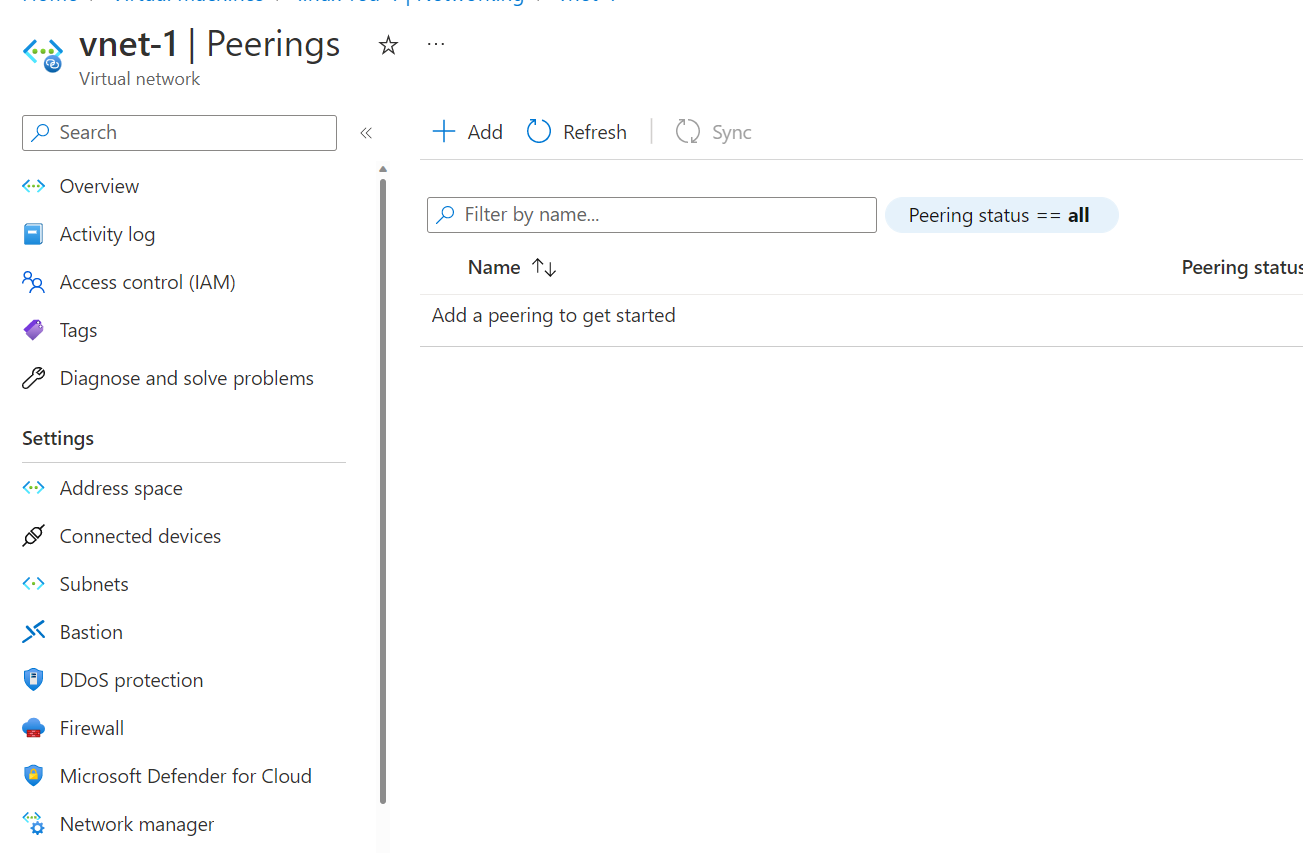
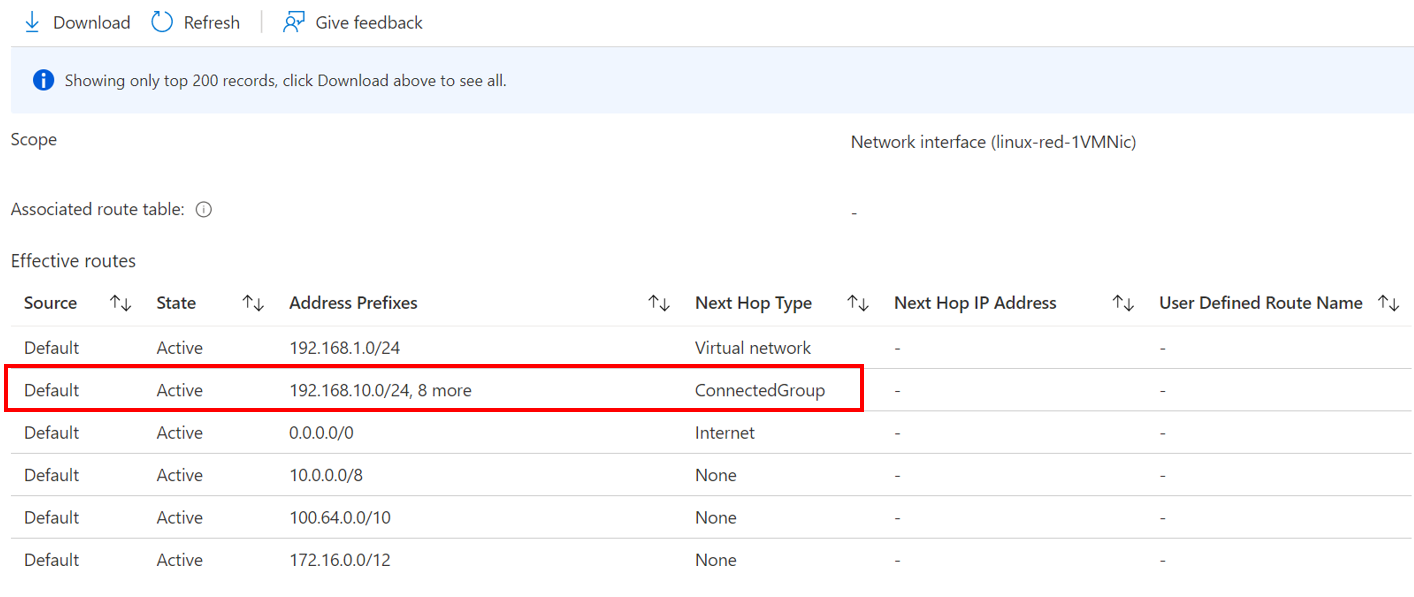
Oh wait... we can't see any peers? How is this working? Don't worry. It uses virtual network peering under the hood. We can see the connectivity configuration applied if you click on the network manager.
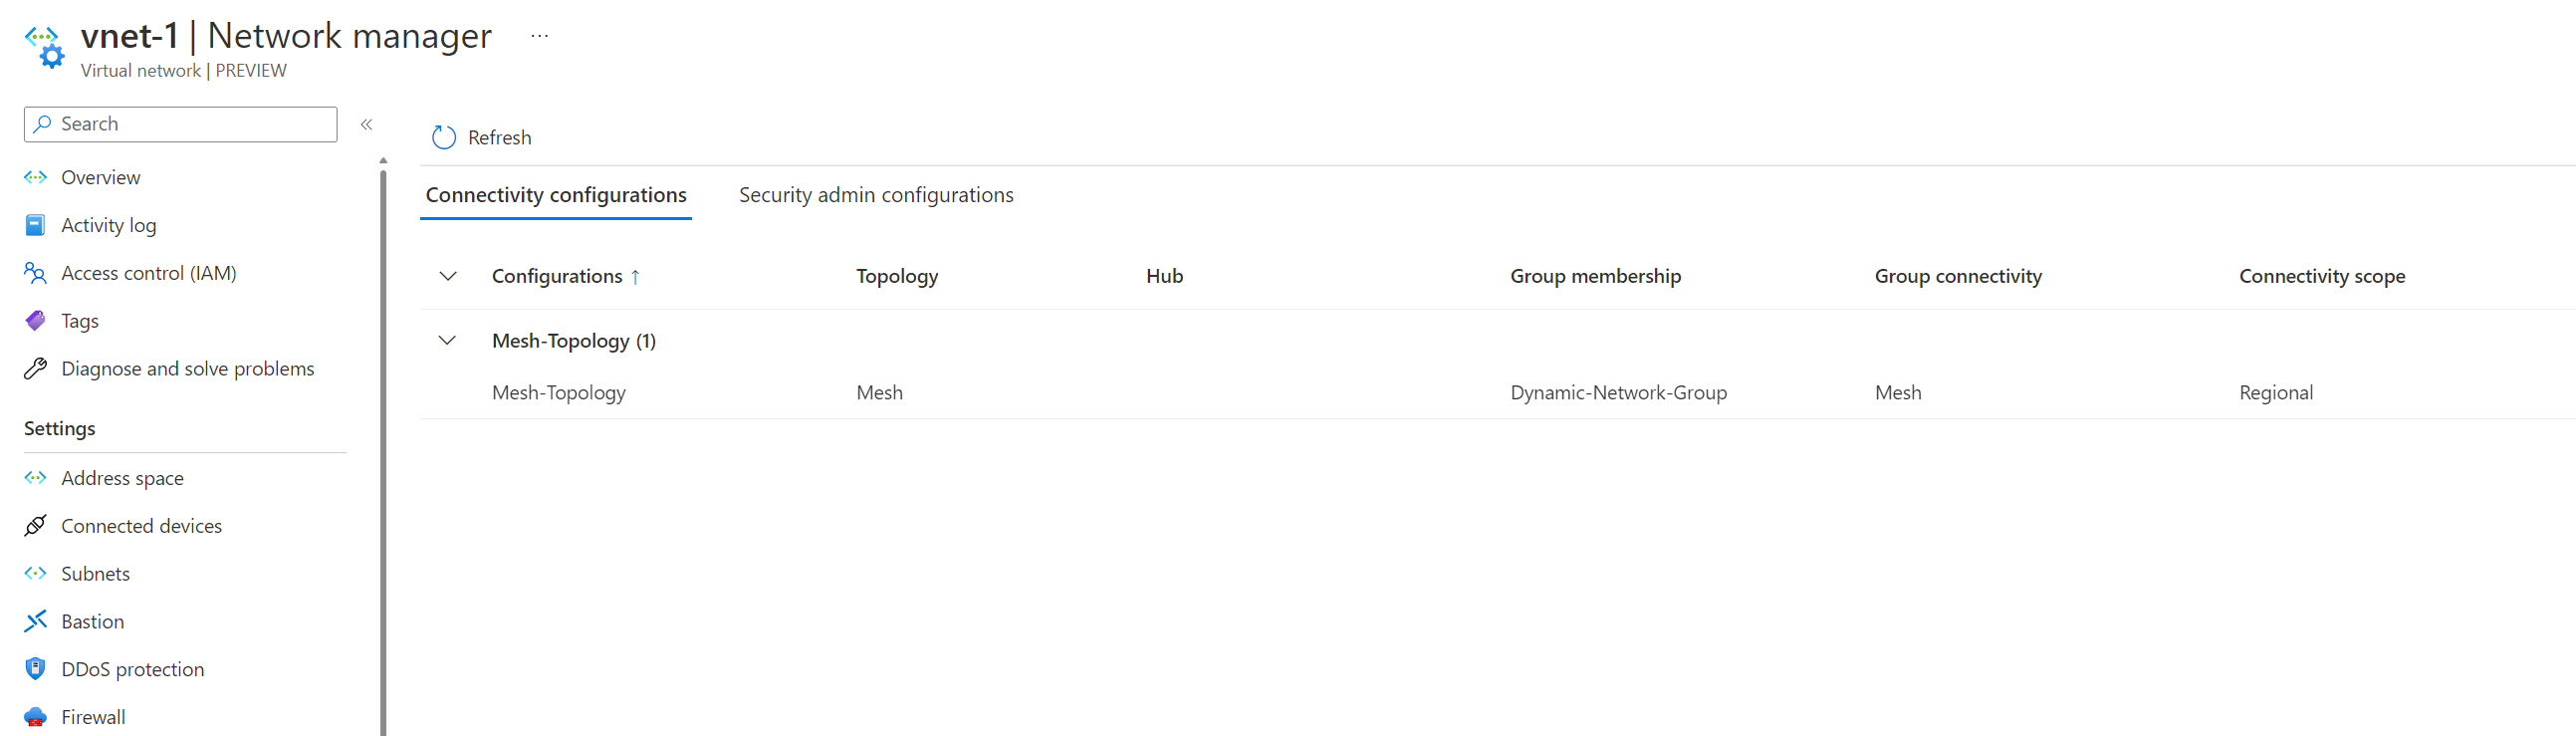
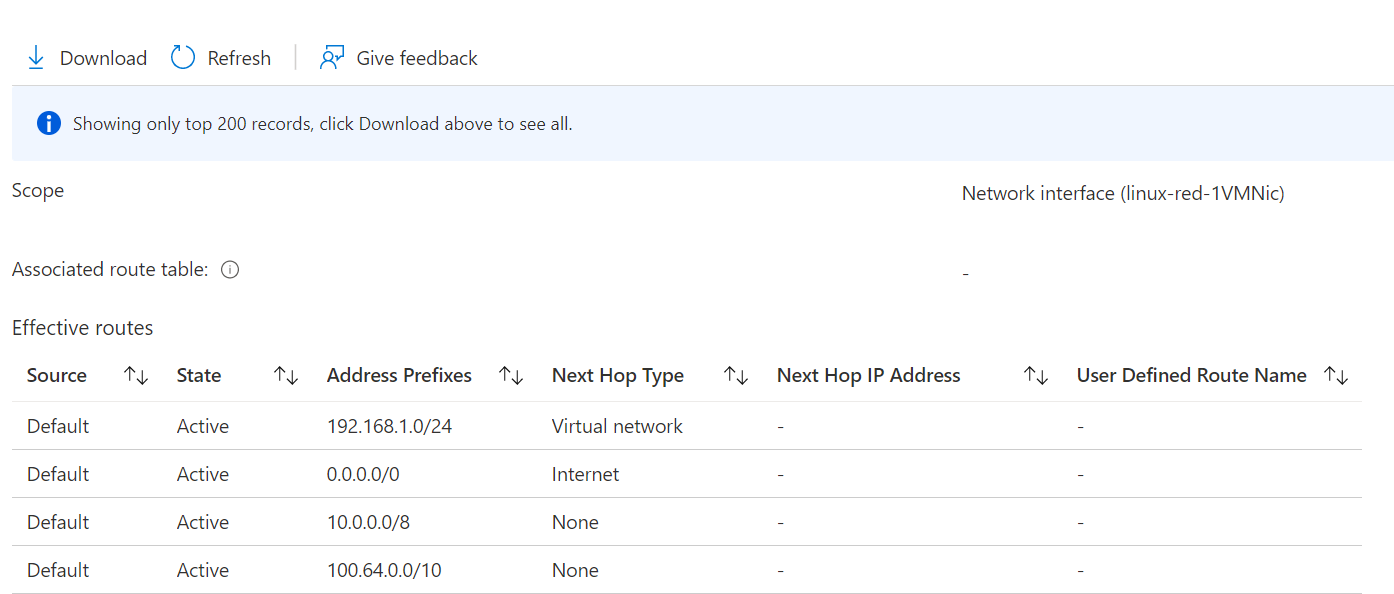
This is because it uses something called Connected Groups instead. If we look at the effective routes of the virtual machine, we can see the routes in the connectivity configuration, and our next hop is a connected group.
Removing virtual networks from the network group?
We use dynamic network groups that look at the tag and value env=test. What would happen if we removed the tag from one of the virtual networks? Does the configuration get removed automatically? Let's find out.
We've removed the tag on vnet-1.

Let's wait for the network group count from 10 to 9, indicating that vnet-1 has been dynamically removed.
It's now been removed. Let's confirm if the virtual network manager configuration has also been removed from the virtual network.
We no longer see the configuration. Let's try rerunning our test with pinging from vnet-1 to vnet-10.
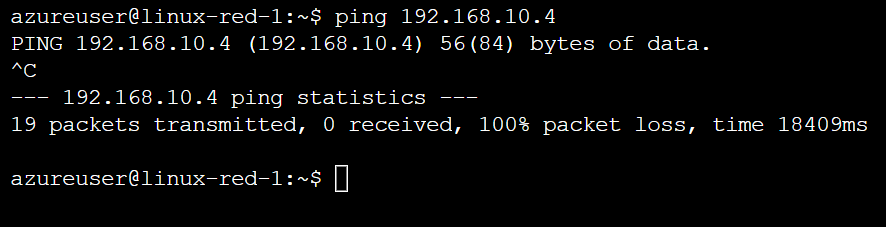
We also no longer see the routes from the connected group being advertised, and I can't ping the virtual machine.
So the virtual network being removed from the network group removed all the configuration from that virtual network. Now let's have a look at the security admin features available.
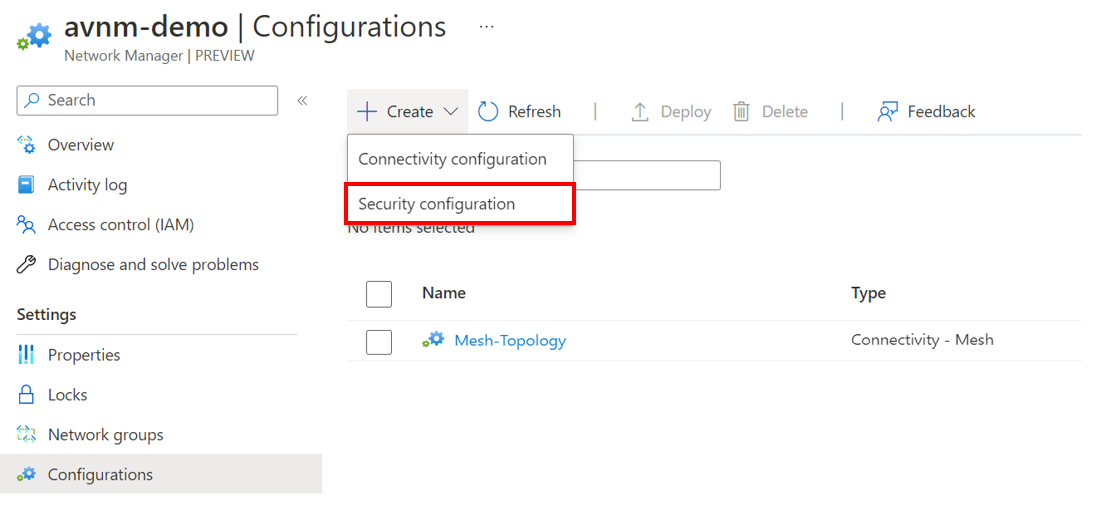
Configurations - Security
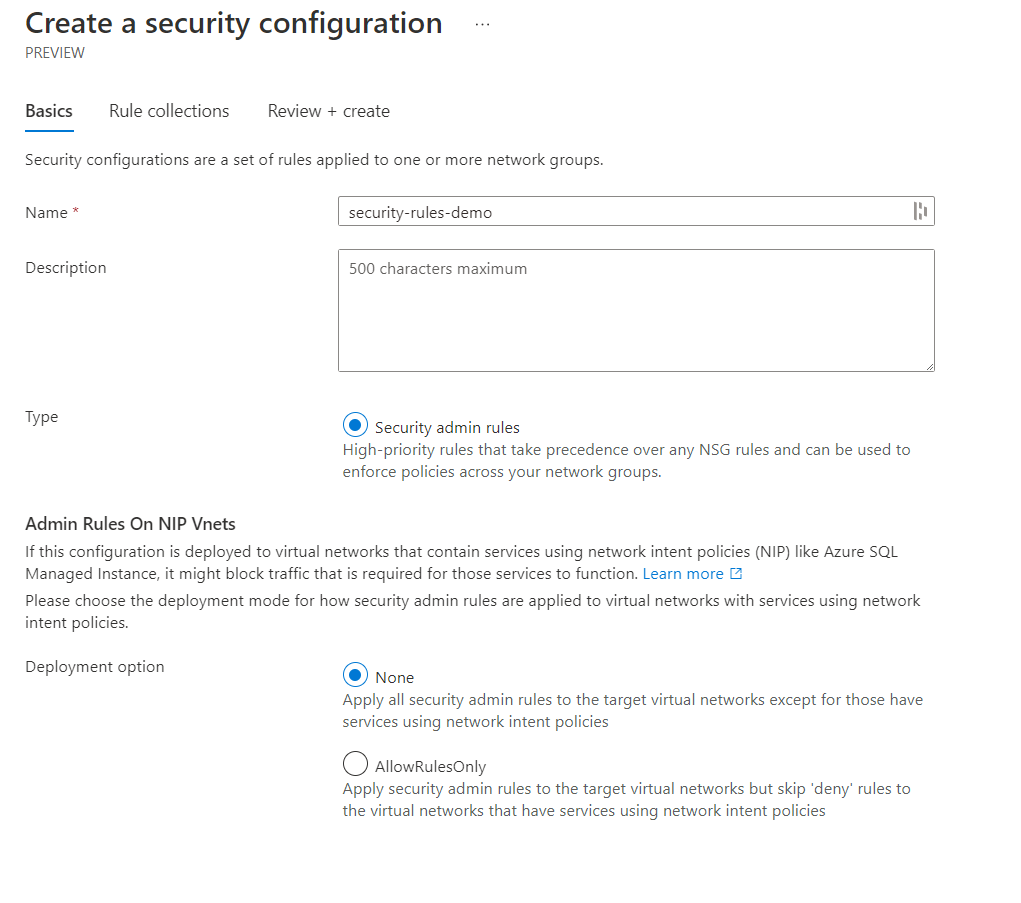
We already have our network groups and will use the same ones we previously deployed; however, we need to set up a security configuration. Go back to your AVNM resource and create a new security configuration.
You'll be asked to provide a name for the configuration, a short description, a type (Which you can only select security admin rules) and the deployment options of None or AllowRulesOnly.
- None - Apply all security admin rules to the target virtual networks except those services using network intent policies.
- AllowRulesOnly - Apply security admin rules to that target virtual networks but skip 'deny' rules to the virtual networks that have services using network intent policies.
A network intent policy is applied to some network services to ensure the network traffic works as needed. By default, a security admin configuration will not apply security admin rules to virtual networks with services that use network intent policies such as SQL-managed instance service.
Click next and go to add a rule collection. Provide a name, select the network group these rules should apply, and then click add to create a new rule.
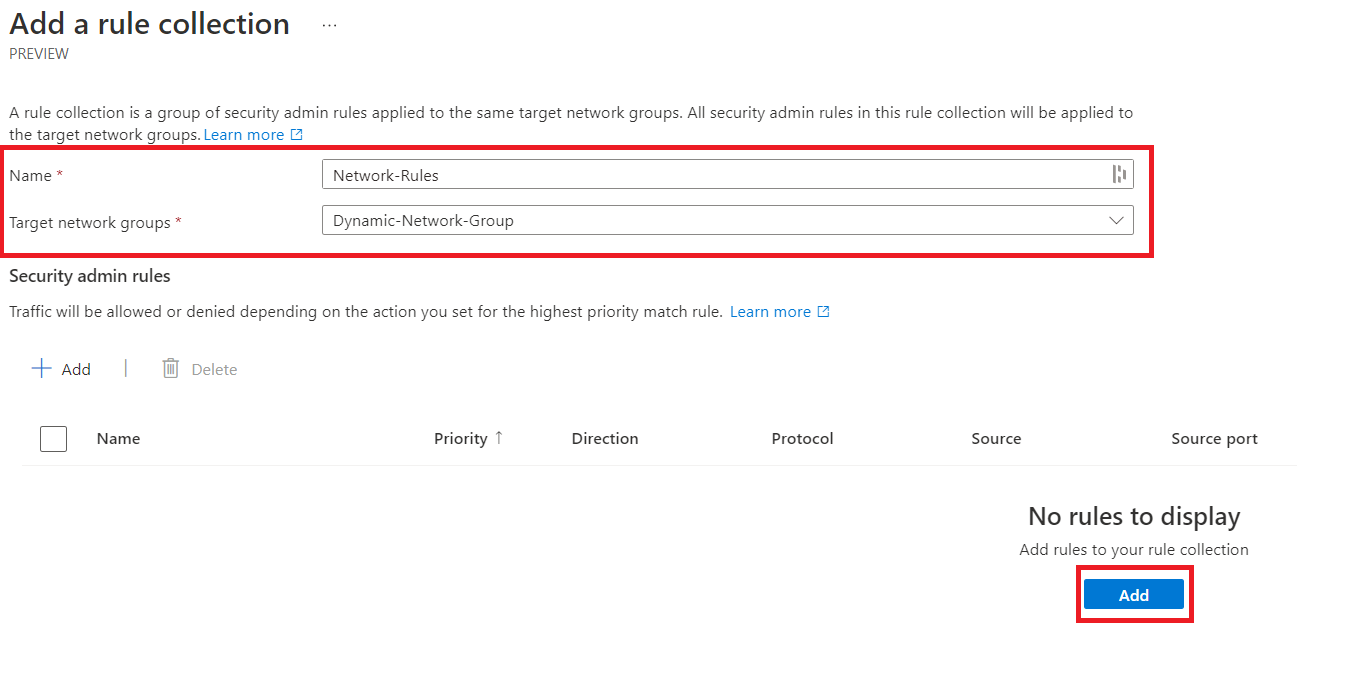
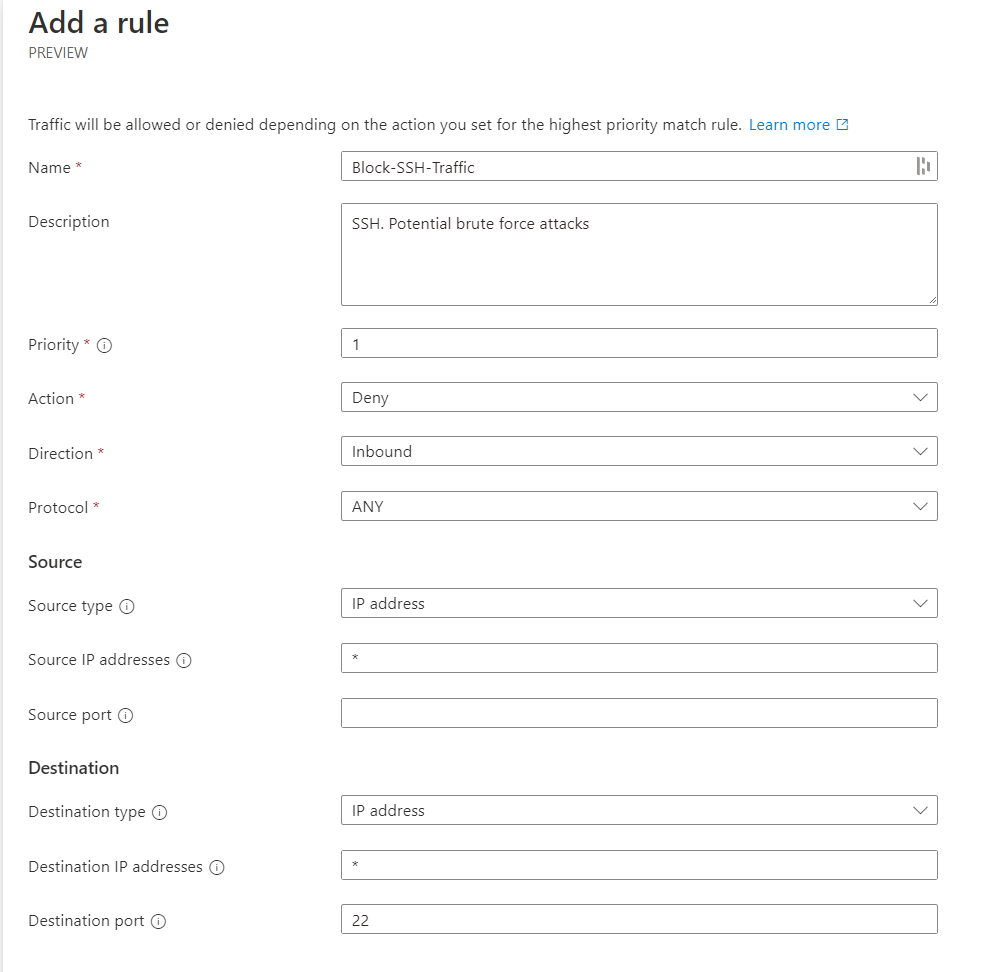
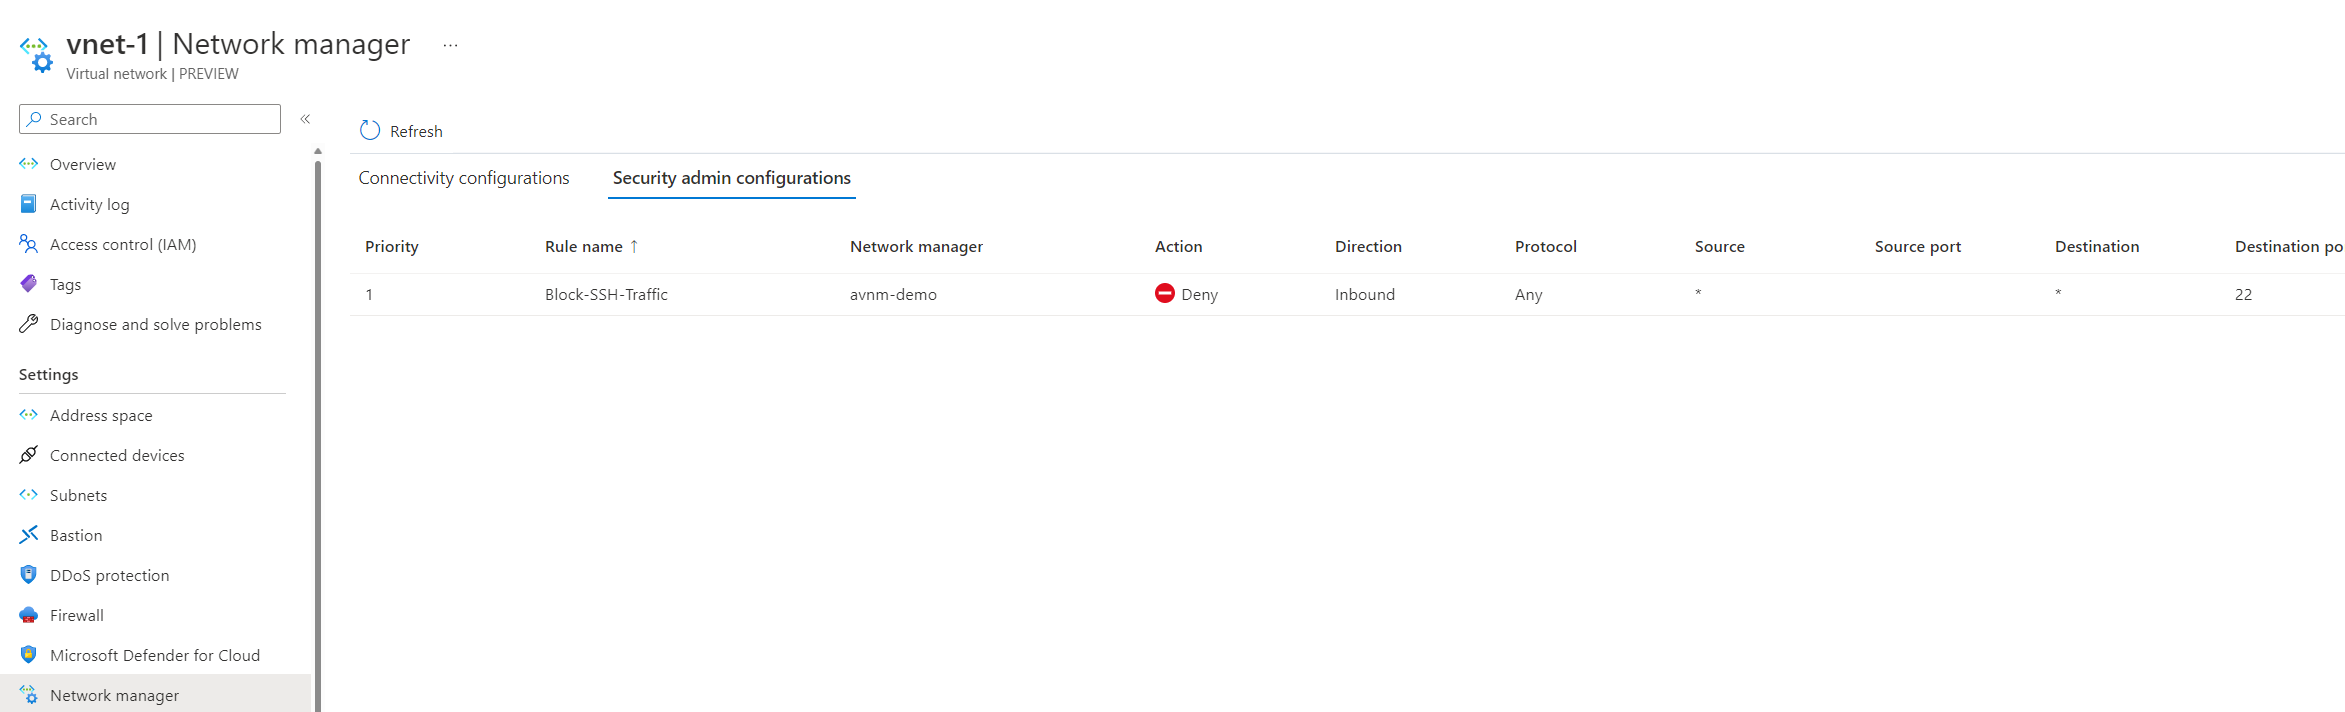
Let's go ahead and block port 22 inbound traffic; this configuration looks like the one below. Once that's been added, go ahead and save this configuration.
The configuration should be available to view; remember, this does not mean it's been deployed. We still need to go to deployments to push this out to our virtual networks.
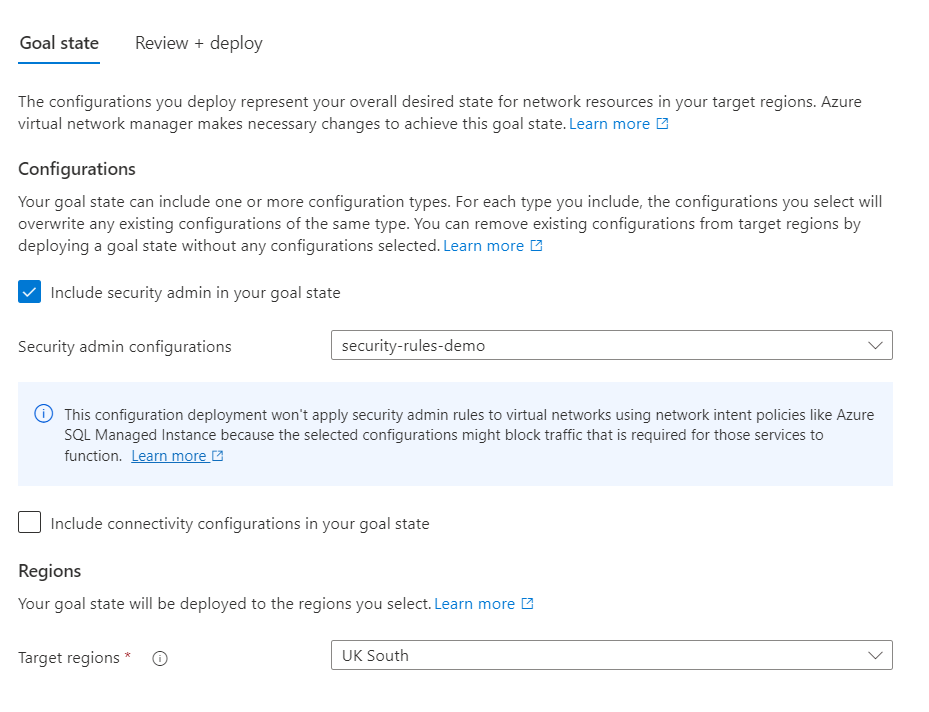
Go to deployments and select deploy configurations.
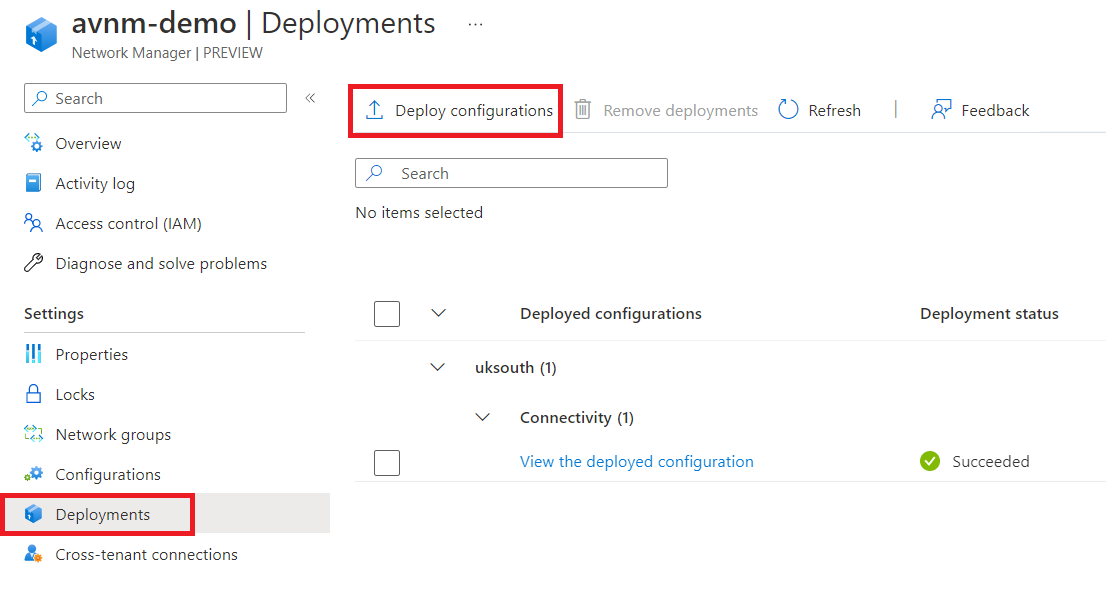
Select the security admin configuration we created and click review and deploy.
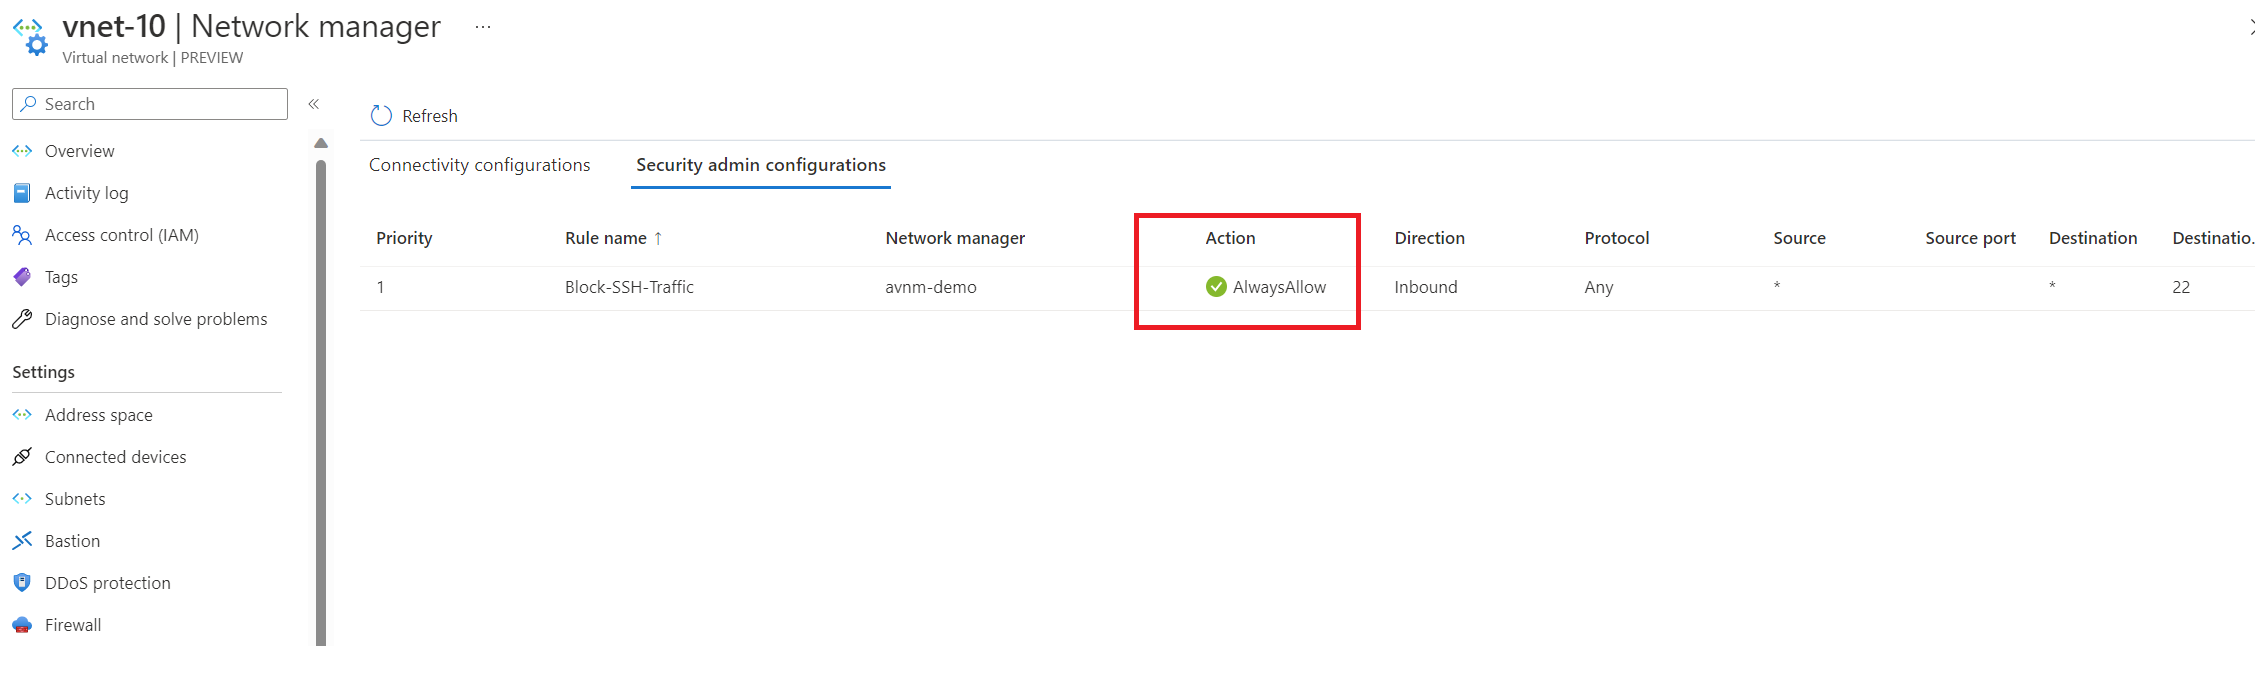
We can confirm it's been successfully deployed! How can we verify it worked? If you go to the virtual network resource and click network manager, go to the security configuration tab, and you should see the rule applied.
Using network watcher, specifically the NSG diagnostics tool, we can confirm that the AVNM security configuration is blocking traffic. It's interesting to see this through the NSG diagnostics tool.
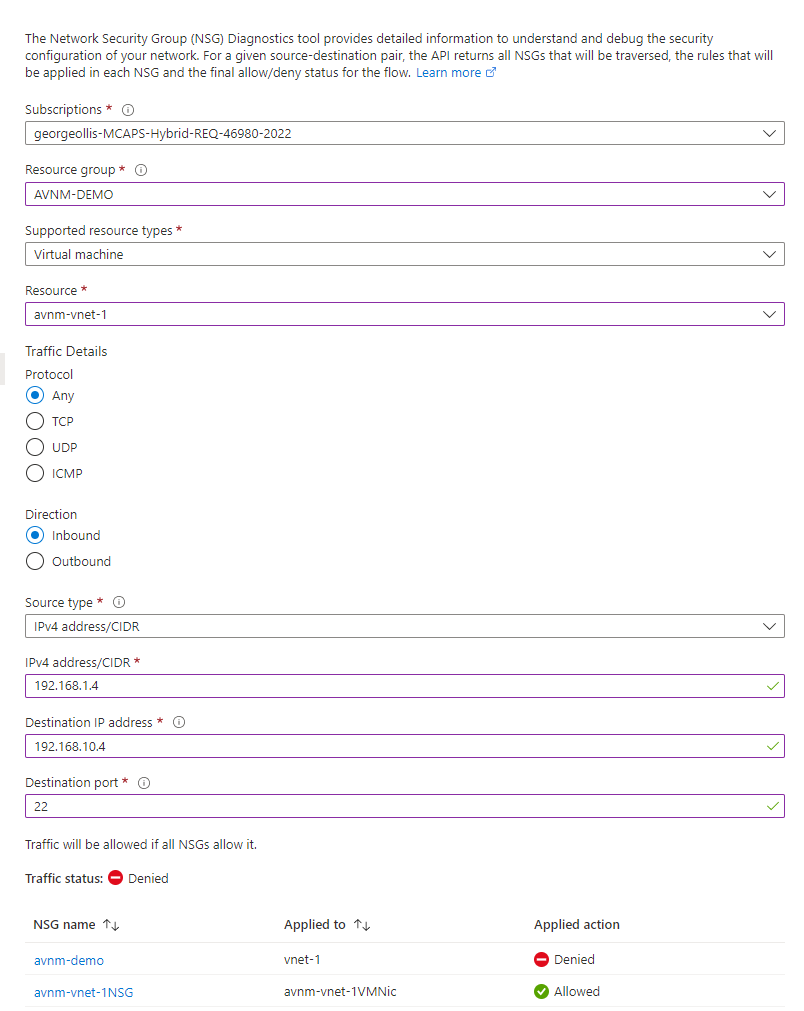
What does this tell us? It shows us that security configurations from the AVNM resource takes priority over NSG rules. Even if the connection is allowed through the NSG, connections will be blocked if you have an AVNM configuration applied.
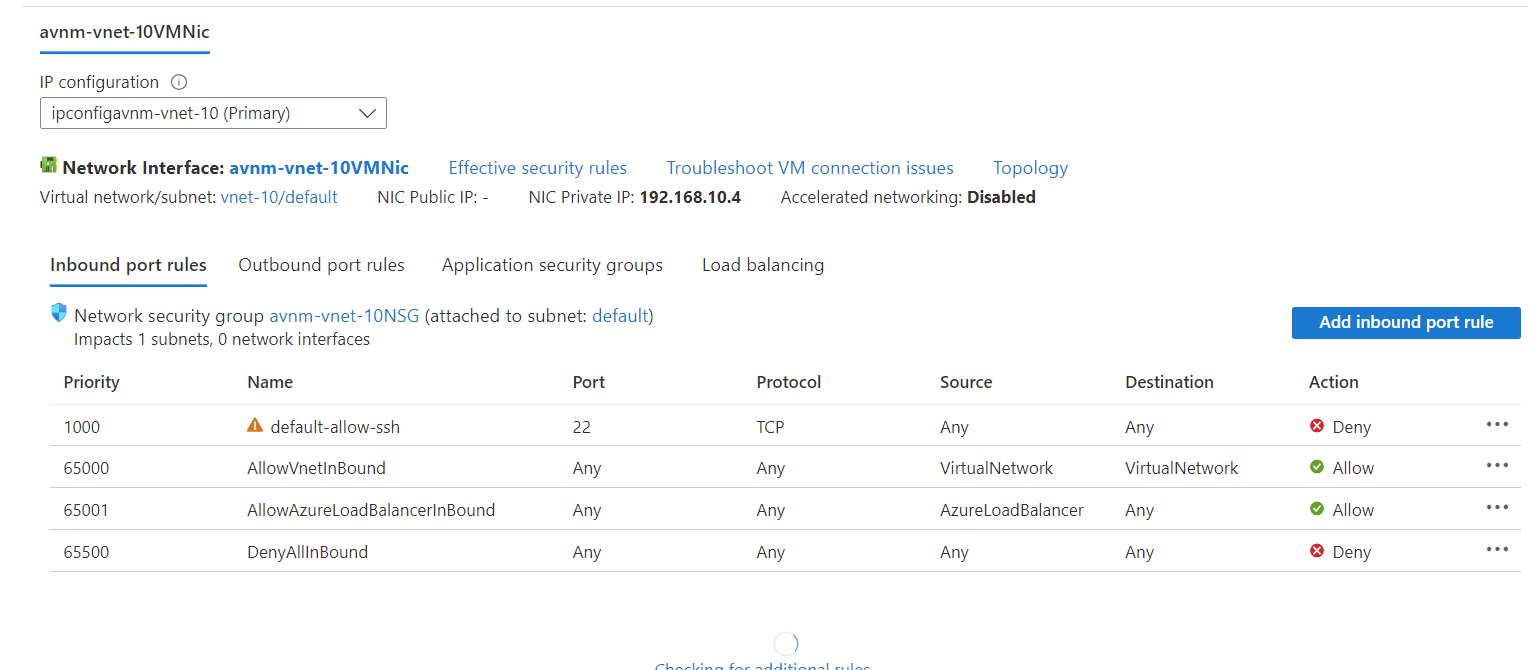
What if we changed the security configuration to allow port 22 traffic and blocked it at the NSG instead? Here's a screenshot showing it's enabled.
We've blocked NSG traffic to port 22 on the default subnet in vnet-10.
This theoretically should mean that the AVNM security configuration will allow the traffic through, but it will then get blocked by an NSG. This time we can confirm that's the case by using a Windows machine running in vnet-1 to run a Test-NetConnection to 192.168.10.4 on port 22.

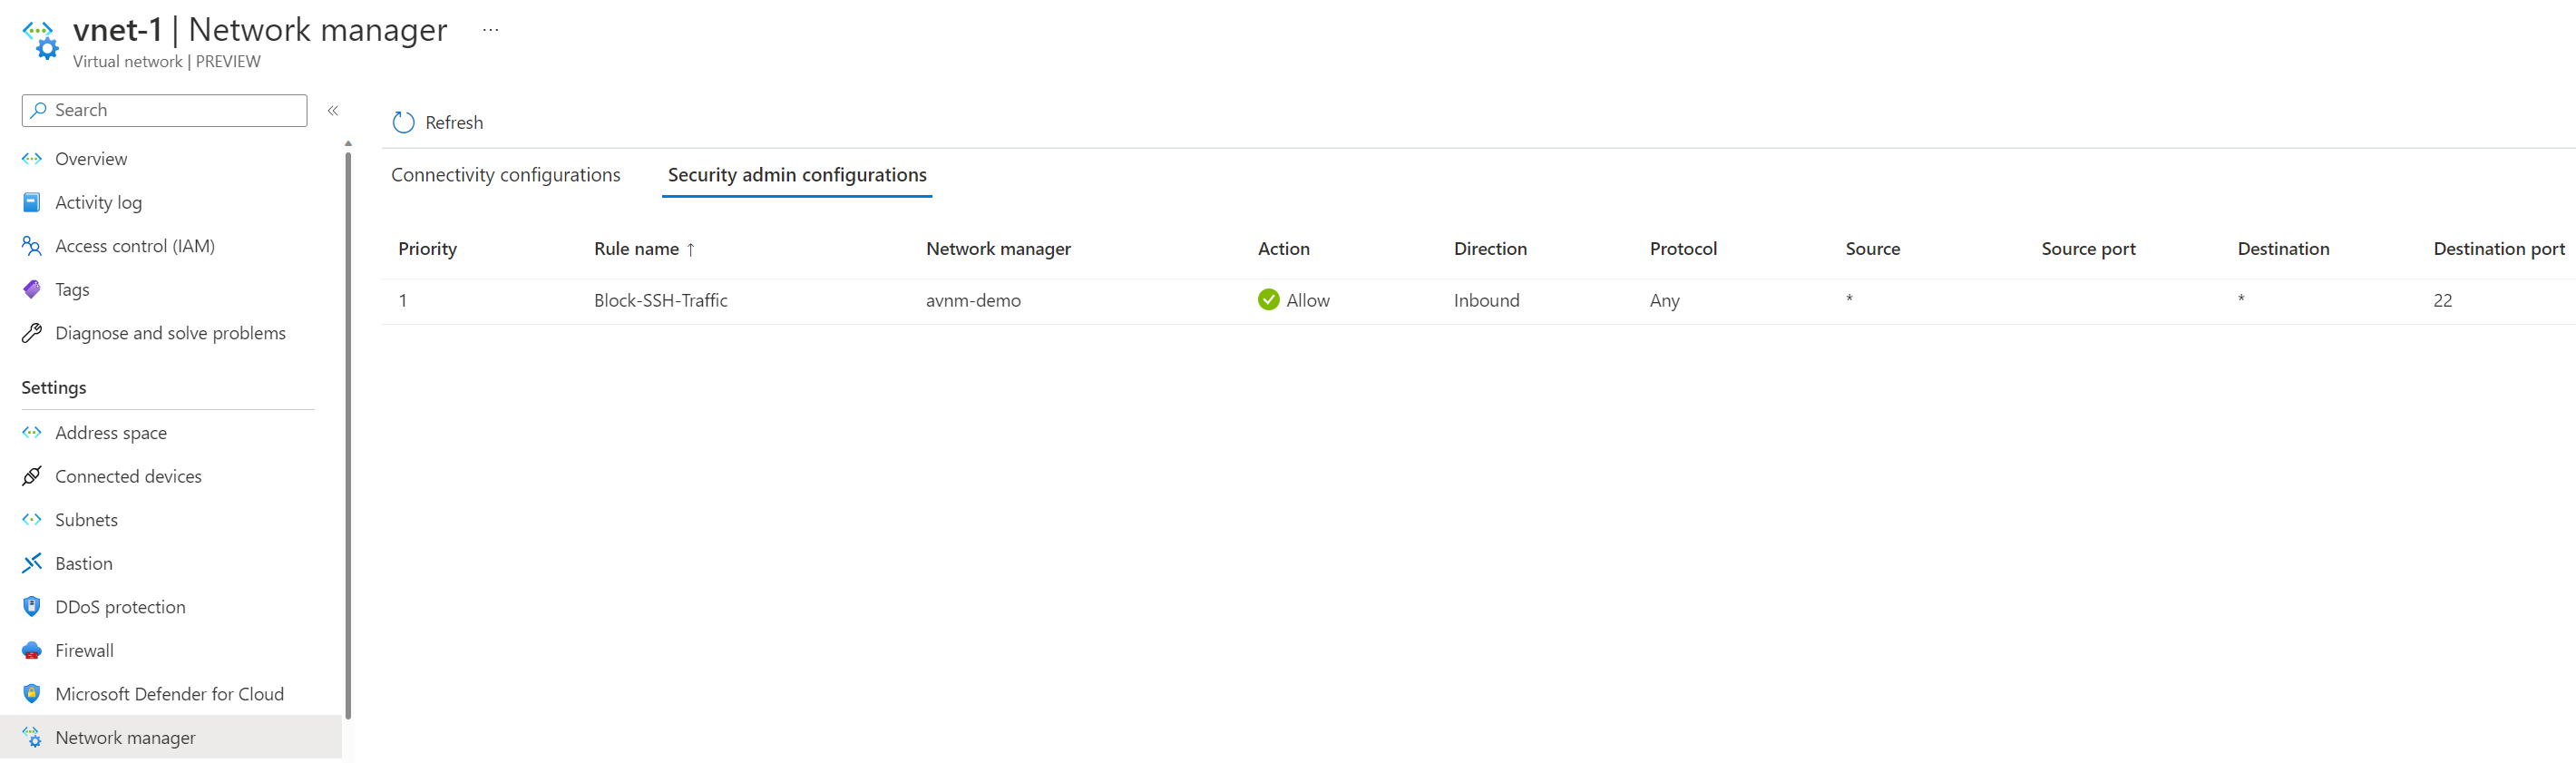
What if we change the AVNM security configuration again from Allow to Always Allow instead?
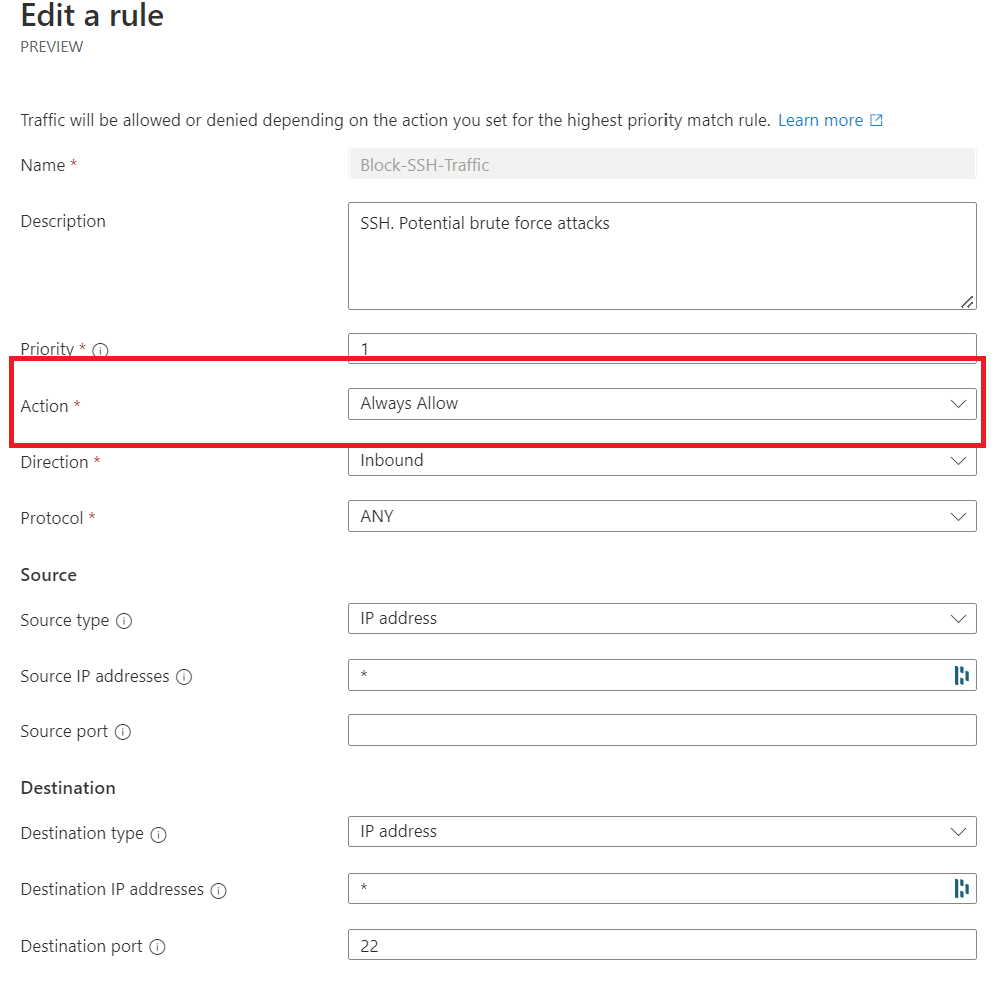
We've confirmed the setting has been applied; let's rerun our test.
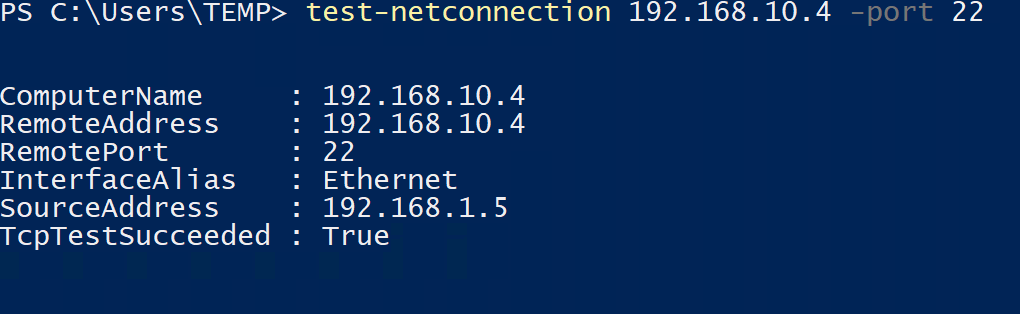
We can now successfully reach 192.168.10.4 on port 22 since the AlwaysAllow rule is in place. I've provided a high-level overview of each scenario we just discussed below.
(1) ANVM denies traffic, but NSG allows traffic
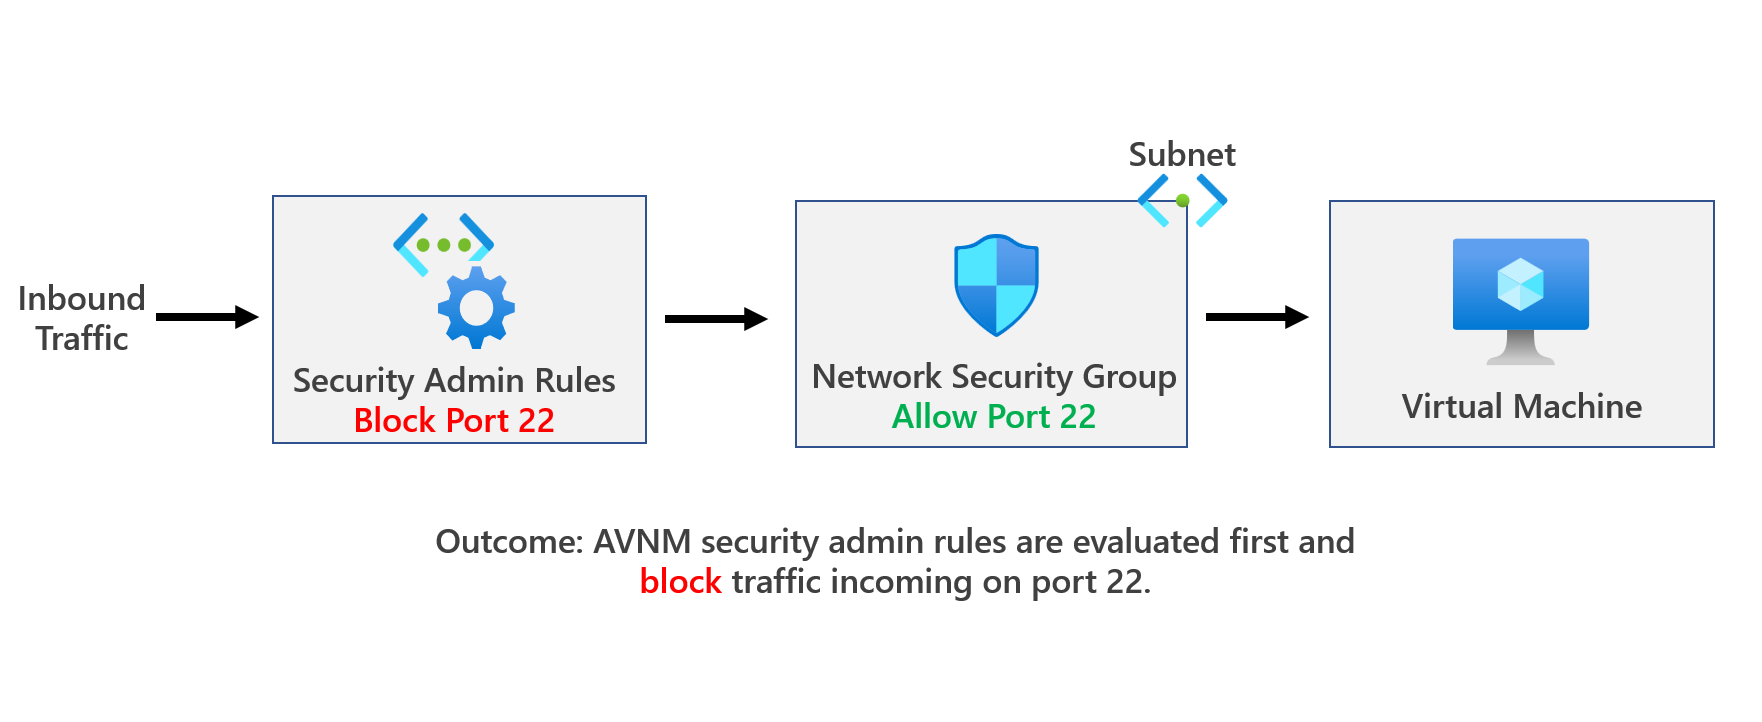
When Deny is used, traffic is evaluated by the security admin rules first, and therefore traffic is stopped without being delivered to the destination even before hitting an NSG. This means you can use security admin rules to set definitive security rules that can't be overridden by others. More info here: Security admin rules in Azure Virtual Network Manager (Preview) | Microsoft Learn
(2) ANVM allows traffic, but NSG denies traffic
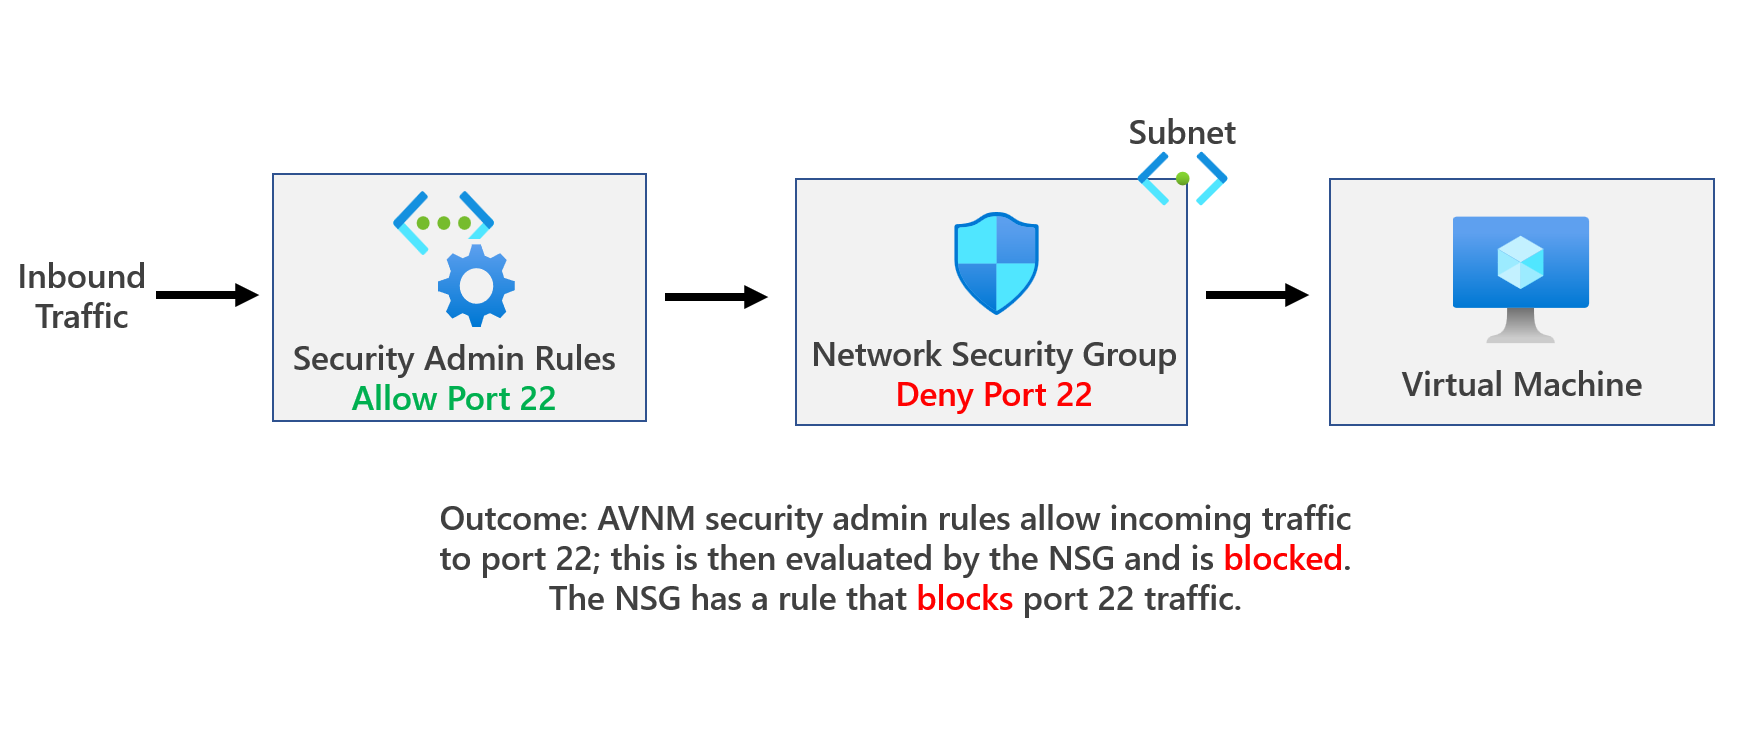
If you create a security admin rule to Allow a certain type of traffic, this rule will be evaluated first. When the traffic is allowed by a security admin rule, it will be further evaluated by NSG rules. This means it leaves room for NSG rules down the line to handle this type of traffic differently as needed. More info here: Security admin rules in Azure Virtual Network Manager (Preview) | Microsoft Learn
(3) ANVM has an AlwaysAllow rule, but NSG denies traffic
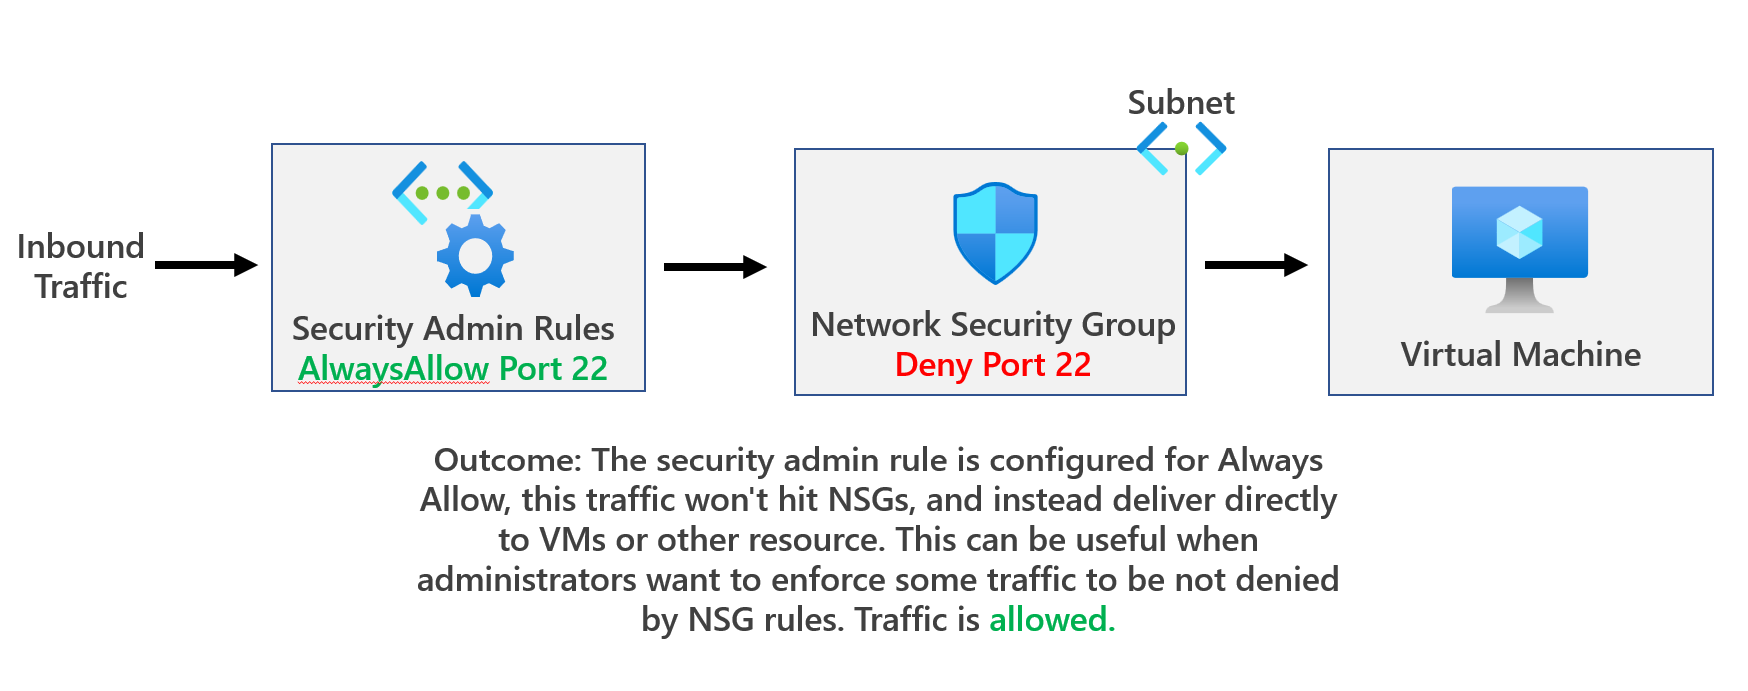
If the security admin rule is Always Allow, the traffic won't hit NSGs, and, instead, deliver directly to VMs or other resources. This can be useful when administrators want to enforce some traffic to be not denied by NSG rules. More info here: Security admin rules in Azure Virtual Network Manager (Preview) | Microsoft Learn
Thanks for reading this blog. Sorry, It was pretty long. Hopefully, it all made sense, and if you have any questions, please feel free to reach out. It's important to note that AVNM is currently in public preview.
Please feel free to connect with me.